In the months leading up to the birth of our first child, my partner and I were beginning to nest. She was busy procuring critical, practical items like clothing, bottles, and toys; I, on the other hand, was busy selfishly scheming a new personal project that would consume the little precious free-time that I had left before the due date. We were quickly checking items off of our list and arrived at a baby monitor.
After searching around I was not very enthused by the available options (more on that in the next section). I was also just starting to get comfortable with Raspberry Pi, GNU/Linux, and other facets of free and open-source software (FOSS). I smugly thought to myself, “Pshh, I can make a better baby monitor than any of this junk for a fraction of the price!”… Alas, dear reader, in hindsight, I do not think that I made out like a bandit with the world’s greatest baby monitor in one hand, and a wad of spare cash and time in the other; but, I am very happy with the end result and am glad that I refused to settle for any off the shelf solutions. Arriving at a final product was not all that expensive, but for a novice like myself, it was very time consuming. Most importantly, I learned a lot along the way; and come on, we all know that the real gift is not cold hard cash, it’s warm soft knowledge.
Anyways, in the rest of this article I will try to justify my ludicrous actions and provide a description for anyone who would like to build something similar. Feel free to skip over to the accompanying GitHub repo where you can find step-by-step instructions and configuration files to set things up.
My hope is that this article may provide others an outline to follow or, at the very least, something to point and laugh at.
“Why not just buy a baby monitor?”
You know what? fair question! In short, I’m hard-headed, cheap, a little paranoid, and have the heart of a hobbyist. If you aren’t interested in building something and the idea of banging your head against the wall for a few hours per day doesn’t sound appealing, then just buying one is the right answer. However, I think the final Baby SpiCroft is pretty kick-ass and there’s also a lot of room for improvement and additional features, so if building stuff is your thing and you have a baby on the way, I would highly recommend building your own baby monitor. The free and open-source tools are robust and plentiful, the hardware is relatively cheap, and the possibilities are endless.
Besides wanting to do it because “why not”, in my opinion, the value proposition for off-the-shelf baby monitors is not that enticing. Obviously, some baby monitors are better than others, but my dissatisfaction with each monitor can be attributed to some combination of the following shortcomings:
- A perceived lack of privacy and security: Many monitors are internet connected and require a proprietary app to view the video stream. One benefit of this is that you can usually use these anywhere, even when you are away from home. I’m not a fan of internet connected baby monitors because of the perceived security / privacy risks associated with my baby’s video and audio feed being routed through a third-party to get to me. Besides, proprietary IoT apps usually suck.
- Lack of convenience and versatility: Radio-based baby monitors avoid the previous downfall, but these require a dedicated receiver with a screen and battery that needs to be looked after, carried around the house, charged, etc.
- Single use electronics: I’m not talented enough to re-purpose off the shelf baby monitor components for other uses, so once these things are no longer needed, they become e-waste. And that’s if the components last long enough to be retired, in reality, these are cheap components that are liable to break for whatever reason.
These are the mental gymnastics I’ve used to justify the time that I’ve sunken in to this project, if you’re feeling as flexible as I am, then lets move on to discussing what my ideal baby monitor should have.
What do I want in a baby monitor?
My requirements are essentially just basic baby monitor functionality:
Minimum Requirements:
- Runs on a Raspberry Pi 3 or 4 without issue.
- Real-time audio and video feed: 1 second or less latency.
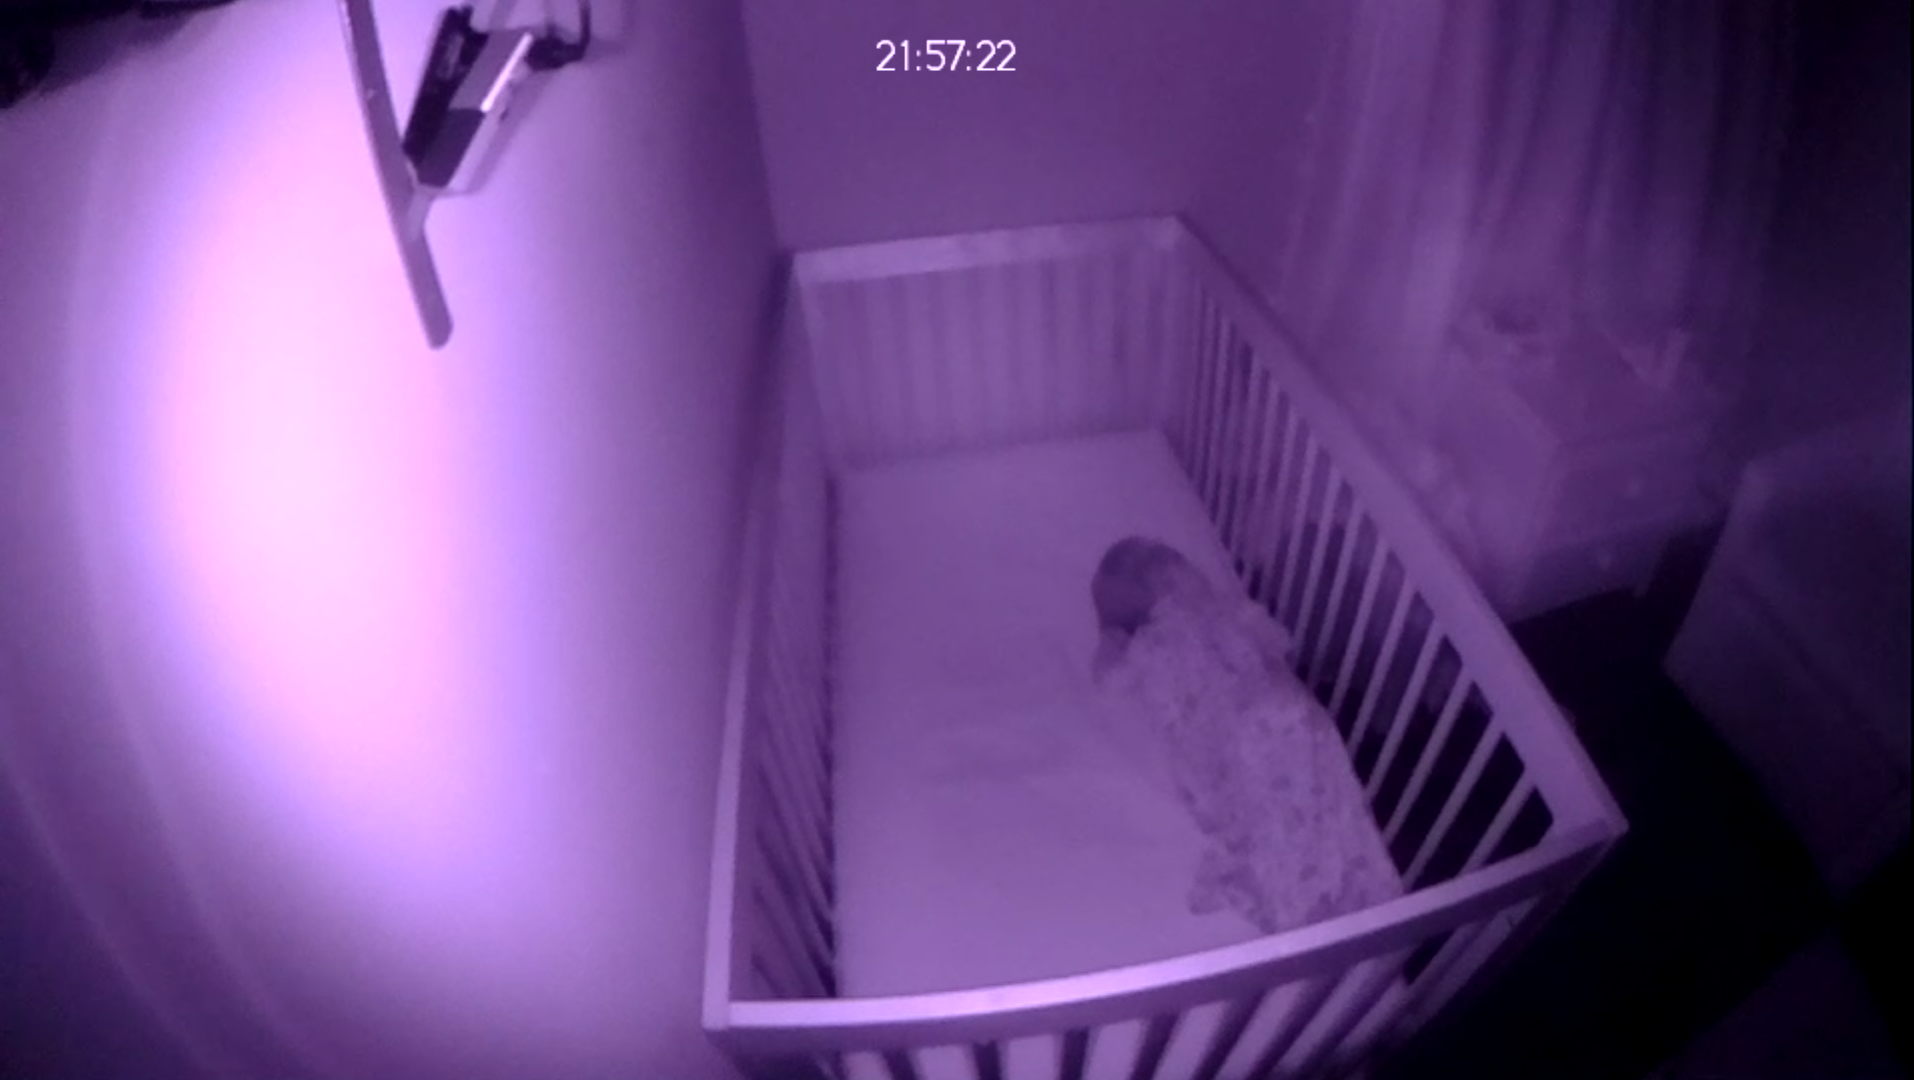
- Infrared camera with infrared source to see baby in the complete darkness.
- Communicate over the local WiFi network.
- Any device with a web browser should be able to connect. It should support multiple devices connected concurrently.
- The connection should be robust: I should be able to connect with my phone, plug it in bedside, and hear the stream throughout the night.
There are also some nice-to-have features that, I believe, make the Baby SpiCroft better than even the most bougie baby monitor at your local Babies-R-Us:
Nice-to-Haves:
- Run a smart speaker program on the same hardware: I have some bookshelf speakers and there’s already a microphone. Can the hardware run the baby monitor and some open-source smart speaker software, like Mycroft’s Picroft project?
- Relatively portable: It can be unplugged and moved elsewhere in the house or even taken on vacation and used on a different WiFi network.
- Act as a Spotify player to allow us to easily play music through the speakers without a bluetooth connection.
With these goals in mind, I began searching for the hardware along with any existing software projects or tools that would support the final product.
Hardware
This is the hardware I ended up using, though there is plenty of room for variation.
Raspberry Pi 4B: The 4B has enough power to run the smart speaker and baby monitor software simultaneously with plenty of overhead left over for other things. If you’re just interested in running either the baby monitor or the smart speaker software, the older 3B is perfectly capable. In my experience it was maxed out when running Picroft to the point where it was not usable for anything else, hence the upgrade to the 4B.
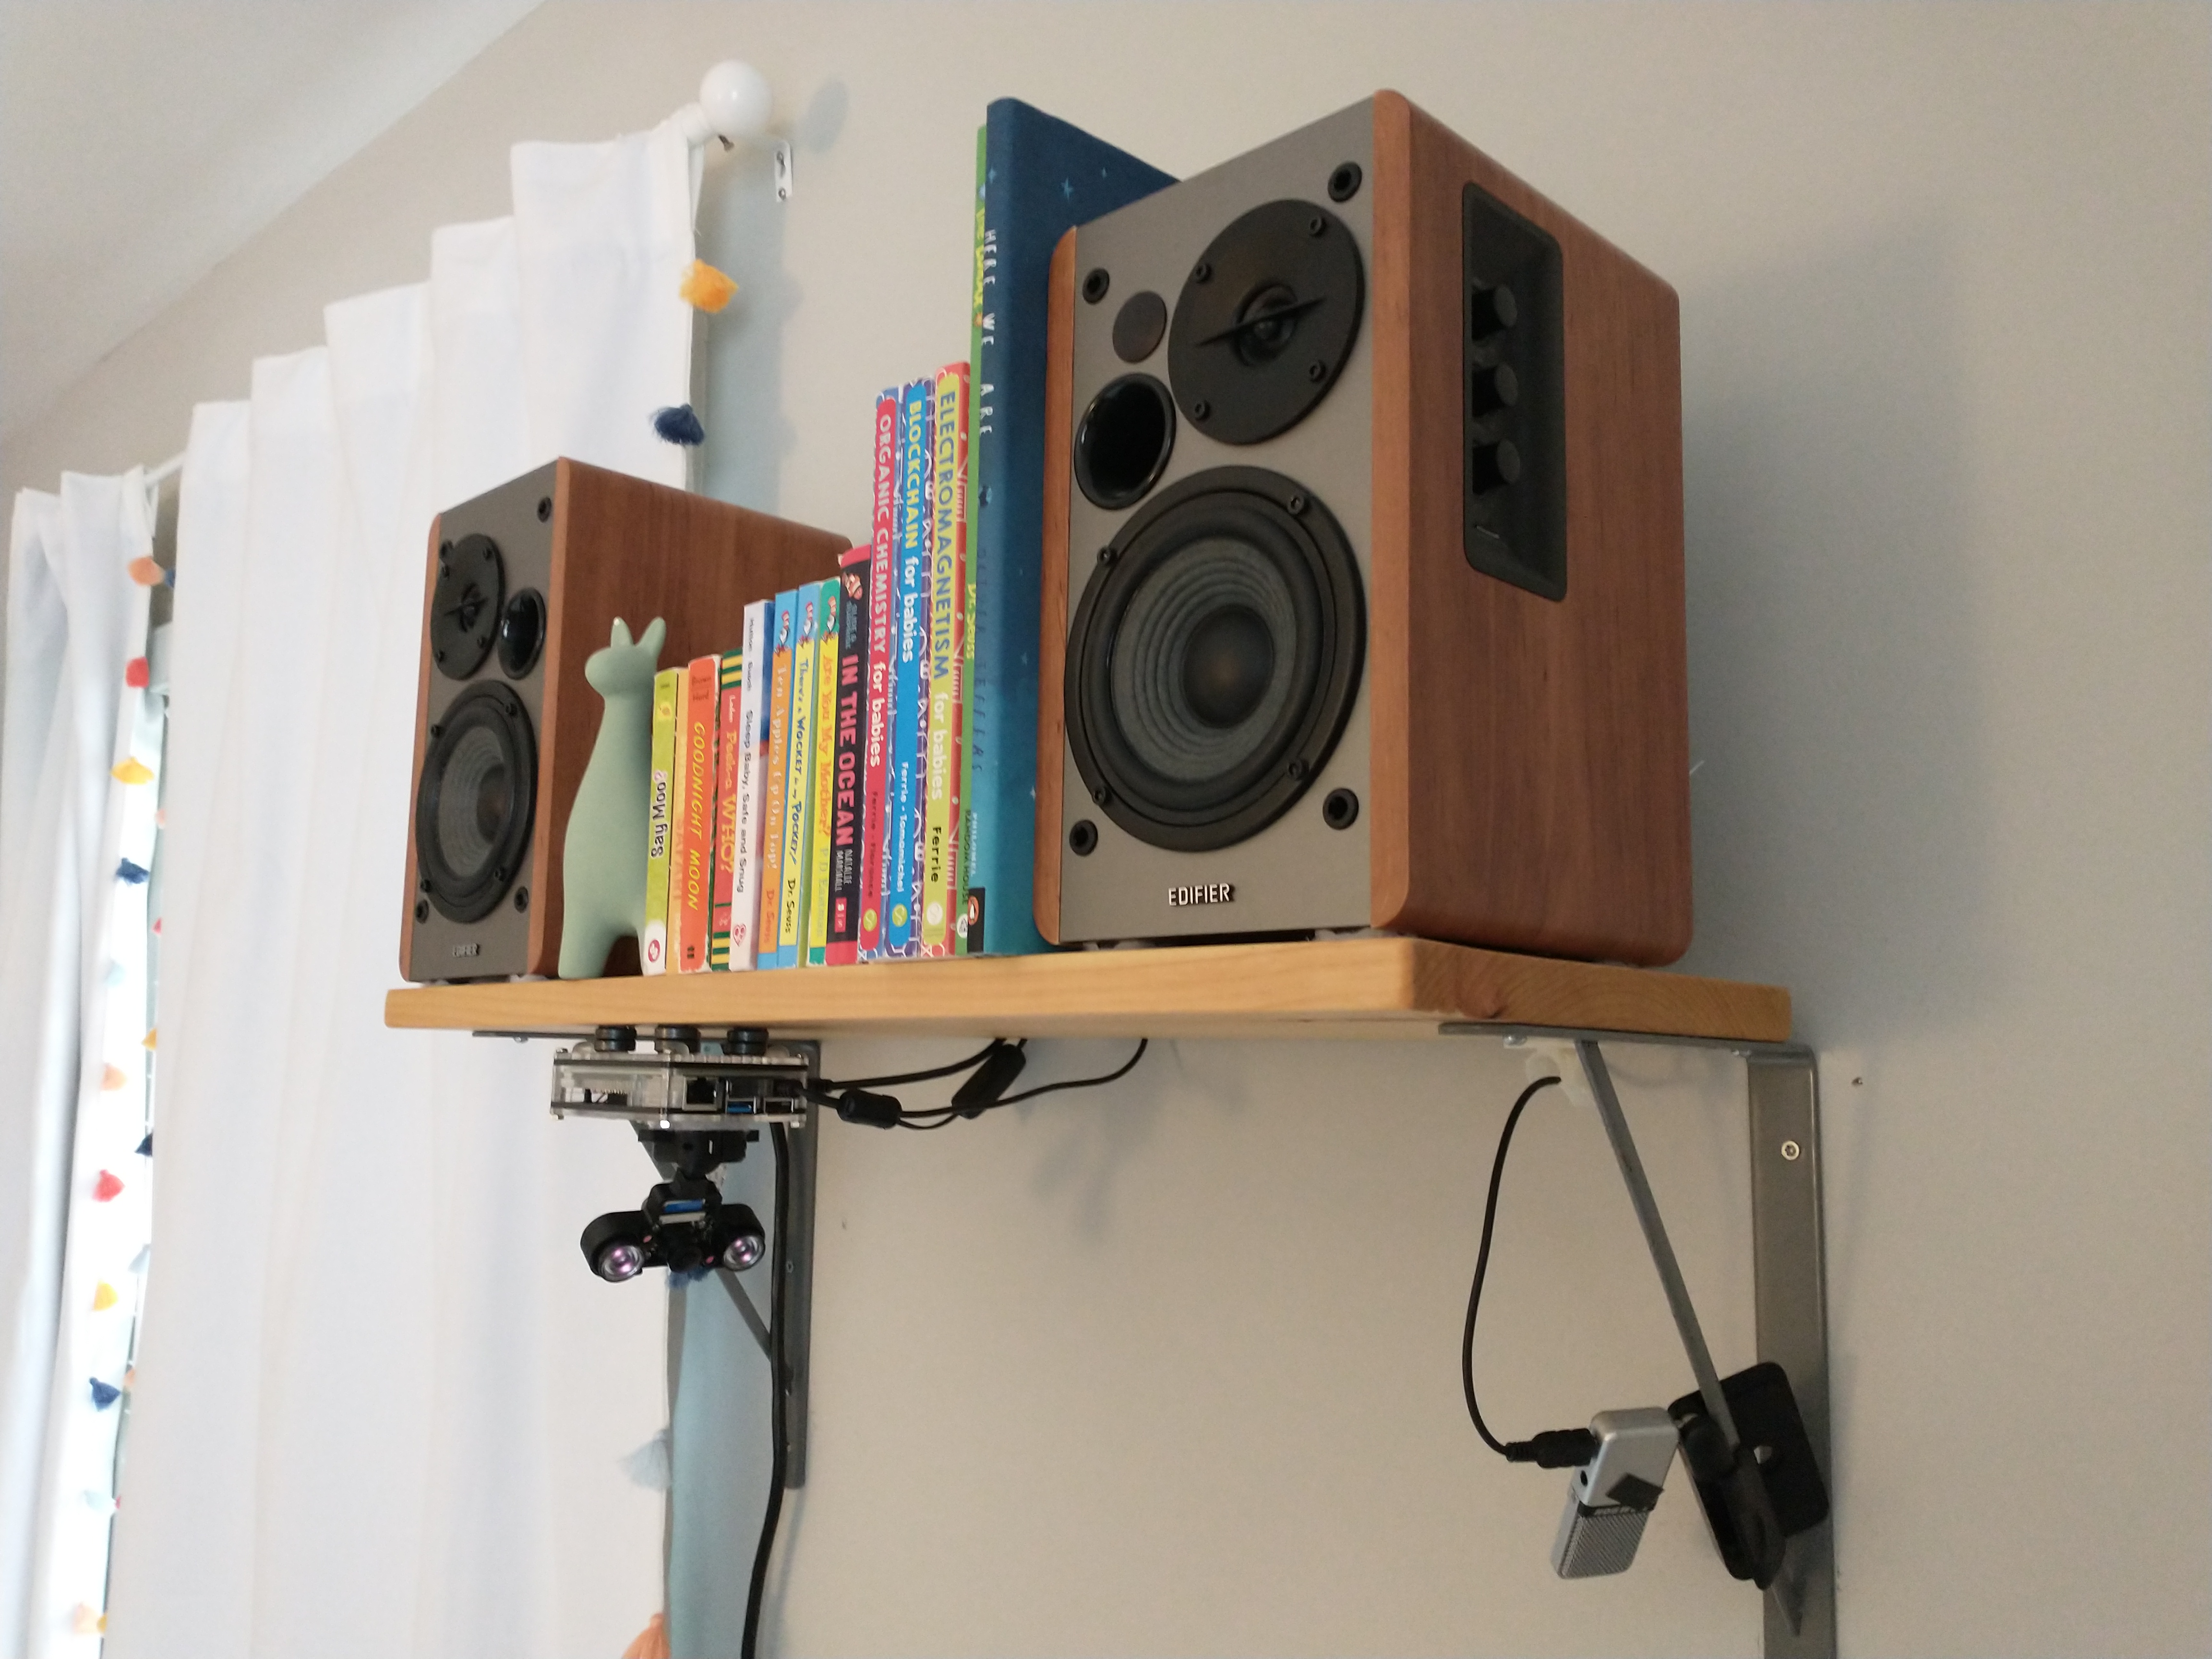
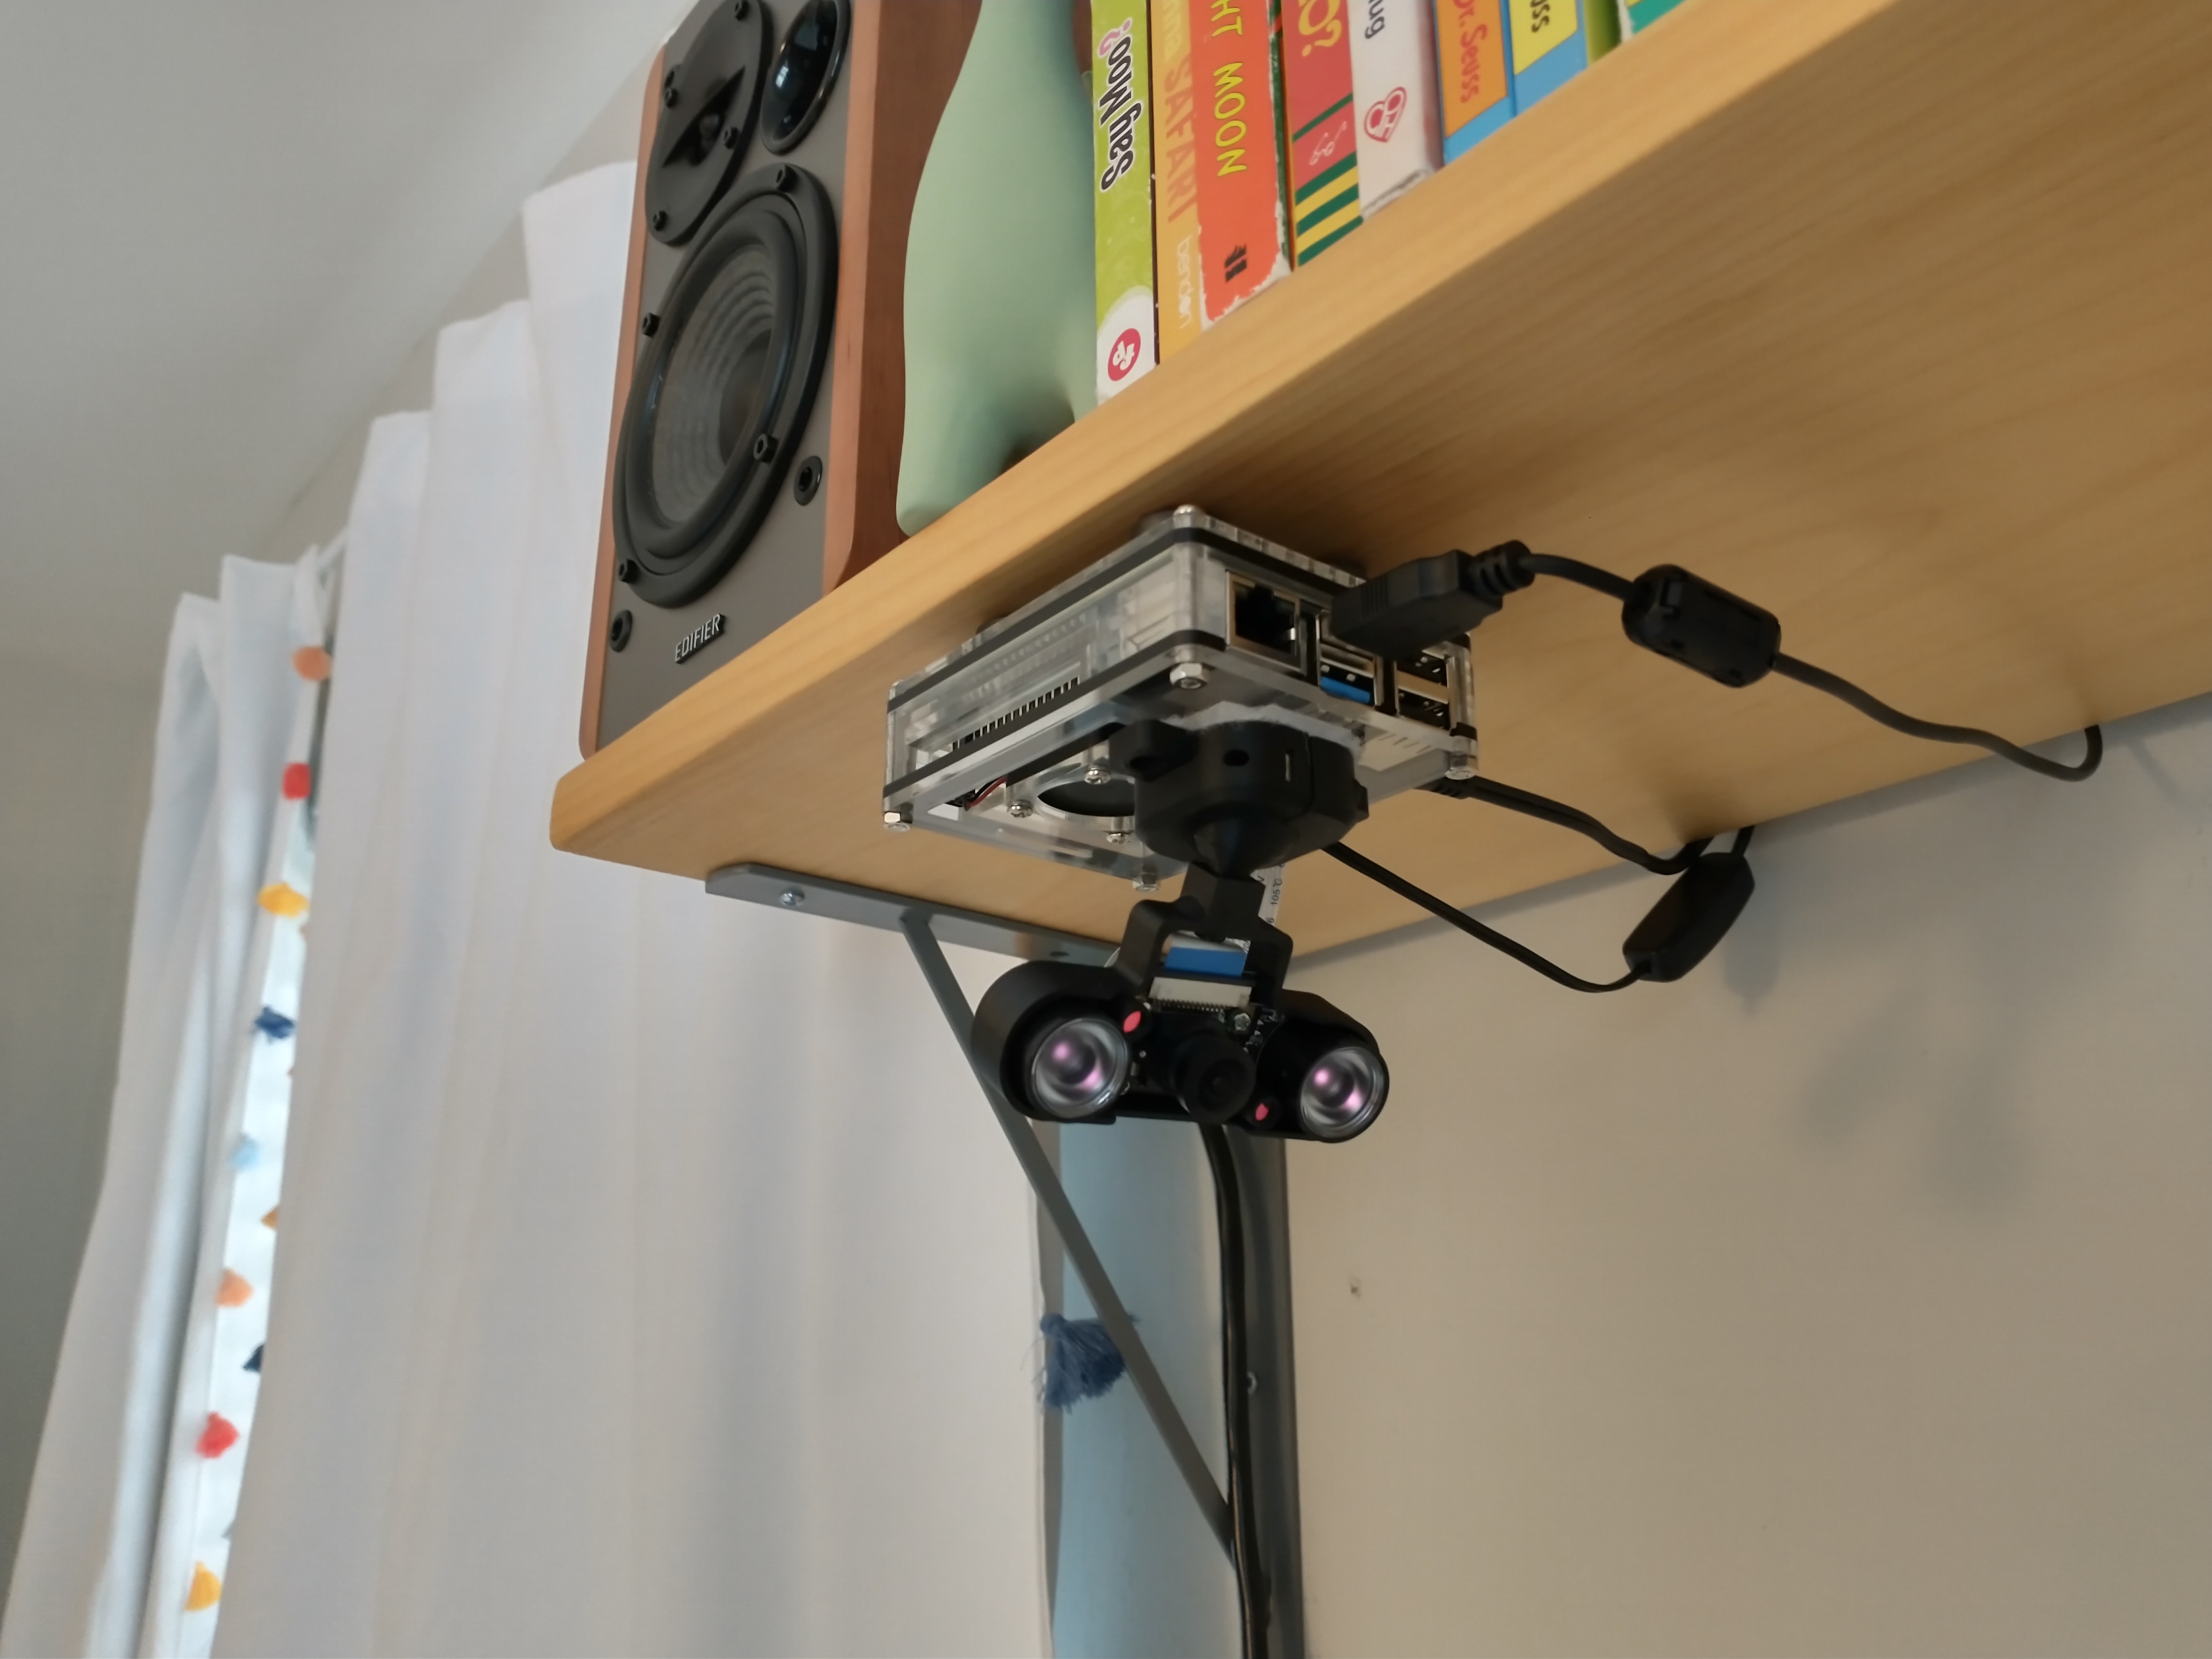
Infrared Camera with Infrared LEDs: Each LED is rated at 3W, so make sure you’re using a proper 3 amp power supply for your Pi. The LEDs put off a faint visible red glow, but they aren’t intrusive or distracting at all.
Infrared Camera Case with Ball Swivel: If you have a 3D printer, you could probably make one yourself. I do not, so I went with this one from INUX3D. It took a long time to get here from Eastern Europe, but I am very happy with the quality and design.
Samson Go Mic USB Condenser Microphone: Any USB microphone should work. This one has good audio quality, a long cable, and a nice little integrated clip / stand that makes it easy to mount or place next to the crib.
Edifier R1280DB Bookshelf Speakers: Speakers are only necessary for the smart speaker part of the Baby SpiCroft. These are connected to the to the Pi via the 3.5mm headphone jack. It is critical to get speakers that do not automatically go to sleep after some time without input (which seems to be relatively common). The first sound bar I purchased did this which made them unusable for this use case. I’m fairly happy with these Edifiers. I will say, their website has some fantastic marketing photos, so I was a little disappointed with the build quality, but they do sound pretty good for the price.
Raspberry Pi Case: Heat sinks and or a fan are a welcomed addition. I went with this one.
Velcro With Adhesive Backing: Used to mount the infrared camera case to the Raspberry Pi housing.
Magnets and Double Sided Tape: These were used to set up camera mounting stations around the house.
Software
While searching around I came across a few projects with similar goals, create a baby monitor with a Raspberry Pi and infrared camera. Some of these provided a lot of great ideas and inspiration. Specifically, this Baby-Monitor project by Leif Erickson (“hinga-dinga-durgen”) was incredibly helpful in getting me started.

The baby monitor half of the Baby SpiCroft is very similar to Leif’s project, with some simplifications made. Here’s an overview of the software used with my best attempt at explaining what they do, I assure you I will not do these projects justice, so please go check them out for yourself.
Baby Monitor: Putting the “Baby Spi” in “Baby SpiCroft”
First I’ll cover the software needed to get just the baby monitor up and running.
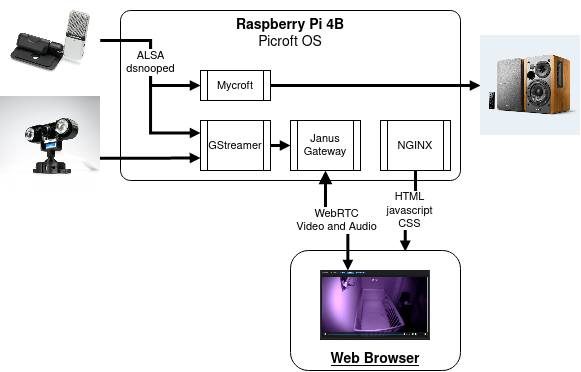
Advanced Linux Sound Architecture (ALSA) and Dsnoop: ALSA is part of the Linux kernel and enables applications to interact with with audio devices, like our USB microphone. By default, only one application can connect to one audio device, so we use the Dsnoop plugin to enable multiple applications (e.g. the baby monitor and smart speaker application) to listen to the same microphone.
GStreamer: Gstreamer can do much, much more than I could ever comprehend, so I will just cover how it’s used here. GStreamer grabs the video and audio data from our input devices and creates streams (h264 for video, Opus for audio) which are posted to separate ports on the Pi. The user’s browser will eventually connect to these streams.
Nginx: When the user’s browser first reaches out to Baby SpiCroft, i.e. navigates to https://<IP_Address_of_the_Pi>, to connect to the video stream, Nginx is there to provide them with the HTML, CSS, and JavaScript files so that that the browser can render the page and establish a WebRTC connection.
Janus WebRTC Server: Janus is doing the bulk of the heavy lifting here. There are multiple components of Janus that are working together to establish and maintain the WebRTC media stream between the client’s browser and the Baby SpiCroft.
- When the user’s browser first connects to Nginx on the Baby SpiCroft it receives a janus.js file, which is the Janus JavaScript library. This file contains all the logic needed to establish a streaming connection from the browser’s side.
- Janus Core, along with the Janus Streaming plugin, is running on the Raspberry Pi waiting for a browser to request a connection.
- Janus Core and the Janus Streaming Plugin negotiate a WebRTC connection between the browser and the Janus Streaming plugin, and Abracadabra! you have a live, low-latency audio / video feed of baby in your browser!
That covers the software needed to get the baby monitor up and running. Next we’ll briefly talk about the software that breathes artificial life into our baby monitor with an open-source smart speaker project.
Mycroft, the Open-Source Voice Assistant
By far the easiest part of the project set up is installing the Mycroft Voice Assistant. Mycroft maintains a version of their platform called Picroft which, you guessed it, is designed to run on Raspberry Pi! The easiest install method is to download the Picroft disk image and flash it to the Pi’s MicroSD card. After the first boot a setup wizard walks you through initial configuration and the voice assistant is up and running! The baby monitor software is installed and setup and installed on top of the Mycroft provided Picroft operating system, which is just Raspberry Pi OS Lite.
There are a few extra steps necessary to get the Baby Monitor and Picroft software to work well together. These steps are all documented in the “Baby SpiCroft Setup File” project repository.
My experience with Mycroft has been pretty good so far. It’s not as hands off as larger closed-source projects like Google Assistand or Amazon Alexa, but it’s pretty damn good for something that is free and promises better privacy. Our main uses for Mycroft are:
- The Spotify skill: Which allows you to control and play Spotify on the Baby SpiCroft speakers. This also causes the Pi to to show up on your list of available players from the Spotify app on your phone, which is a nice little addition.
- Home Assistant skill: We use this to turn a nursery lamp on/off with a little smart plug and a Home Assistant instance that’s running on a NAS system.
Installation
Detailed steps and commands can be found in the “Baby SpiCroft Setup File” project on GitHub.
Conclusion
I had a lot of fun putting this together and the final product turned out to be surprisingly reliable and useful. Hopefully someone else can make some use of this recipe or create something even cooler.
Thank you for taking the time to read this and stay tuned for more projects and posts in the future!
P.S. If you’re looking to add another bell or whistle to this contraption, might I recommend my Baby Tracker App project which runs alongside Baby SpiCroft and serves up a web app on the local network which allows you to track important baby events throughout the day. We found this to be very helpful throughout the first year to keep track of trends in eating, sleeping, and pottying.