We recently added two rooms onto our house and instead of appending these rooms onto our home’s traditional forced-air centralized HVAC system we opted for a two zone ductless mini split heat pump system because they are super cool. ![]()
I absolutely love using Home Assistant to locally integrate and control the various “smart” devices throughout the house, and was excited to have two new climate entities (i.e. the two new wall units) to add to our Home Assistant setup.
A Missed Opportunity
Unfotrunately, due to a lack of communication between me and the HVAC contractor, I ended up with essentially zero input into what make / model of heat pump was selected. The contractor went ahead with the install of two pretty standard seeming Mitsubishi MSZ-GS09NA wall units, one in each room.
These wall units are pretty “dumb” by smart home standards. The heat pump itself works incredibly well and is very efficient, but these are some of the nit picky things that I do not like about it:
- No built in networking functionality, so no control through Home Assistant

- The user interface consists of a very confusing (I mean just look at it - pictured below) and inconveneint one-way remote that is supposed to hang on the wall. To change the setpoint temperature one must take the remote off the wall, point it at the unit, and then mash the right buttons.
- Because the remote only communicates in one direction there’s no way to tell what teperature the wall unit thinks that the room is at, you can only see the current temperature setpoint. This would normally not be a problem, but was something that I kind of needed later on to troubleshoot an issue with the wall units heating the room well past the setpoint.
- If you’re interested, it turns out that the HVAC installer had not sealed / insulated the hole in the wall where the lineset came from the outside. So, the wall unit’s room temperature sensing thermistor was being exposed to freezing cold outside air making it run the heater much more than it should have. We got this fixed
 but it would have been much easier to find the problem if I could tell how cold the unit thought the air temperature was.
- If you’re interested, it turns out that the HVAC installer had not sealed / insulated the hole in the wall where the lineset came from the outside. So, the wall unit’s room temperature sensing thermistor was being exposed to freezing cold outside air making it run the heater much more than it should have. We got this fixed
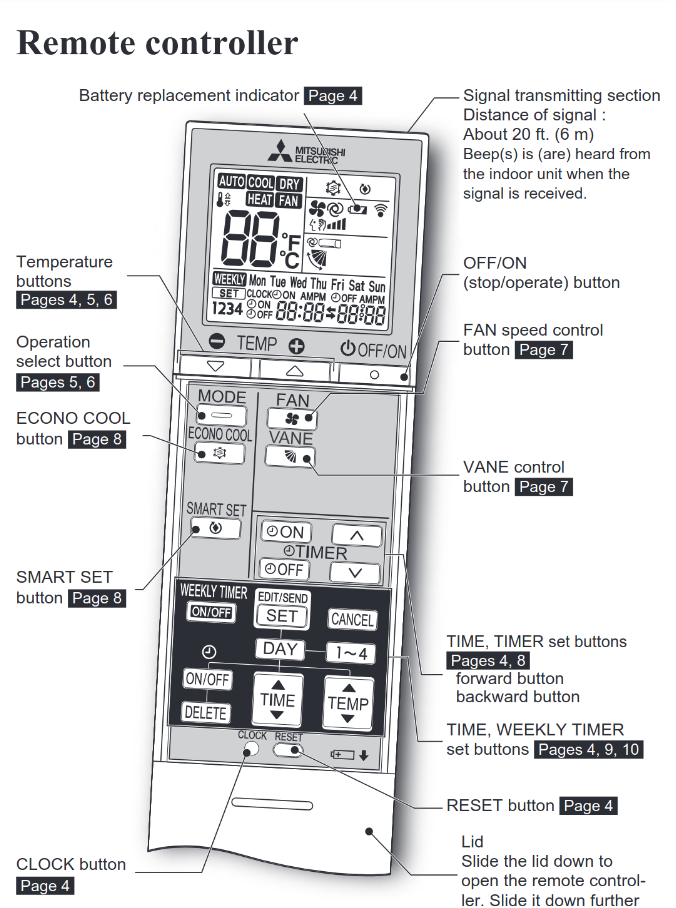
The included remote is soooo easy to use! Best of luck actually using it… Image from Mitsubishi MSZ-GS09NA User Manual
Mitsubishi does sell a “Kumo Cloud Wi-Fi Adapter” for nearly $200 that plugs into a wall mounted unit to connect it to Mitsubishi’s Kumo cloud platform to enable app-based control. But come on, I am not about to pay $400 to be forced to use these things through some crappy cloud service.
Hope On the Horizon 
Anyways, I had resigned to just living with these dumb HVAC wall units, until I found Geoff Davis’s esphome-mitsubishiheatpump project. This project combines ESPHome — a tool that enables very efficient building of custom firmware for the ESP32 microcontroller platform — with the SwiCago/HeatPump project — an Arduino library which has reverse engineered the Mitsubishi heat pumps’ communication protocol — to create an inexpensive, open-source alternative for controlling a Mitsubishi heat pump over WiFi!
In essence, some very smart people have already developed a very cheap way to retrofit “dumb” Mitsubishi heat pumps with a WiFi controller that works 100% locally with no cloud connection. My attention had been piqued. ![]()
This package also seems to work on many other Mitsubishi heat pump units, so go check out their list of supported models to see if it will work for you!
If your unit has cn105 port, it is most likely supported. If your unit has cn100 port, it may work as well.
Let’s Build It!
Thanks to various other articles, projects, and discussion threads I was able to find the hardware needed to make this work with my Mitsubishi MSZ-GS09NA wall units.
Hardware
Through some research and AliExpress I was able to aquire the hardware needed for both wall units for $21.71! Compare that to the $400 to buy the Mitsubishi cloud connected connected hardware.
ESP32 Board
There are many options for ESP32 development boards to choose from. In a tip provided by the esphome-mitsubishiheatpump documentation there were claims that using a Wemos D1 Mini allowed for a very clean install that did not require a voltage regulator or pull down resistors, so I decided to go with the newer Wemos (sometimes branded as “Lolin” apparently?) S2 Mini board. I purchased two of these through AliExpress for $8.00 ($12.45 all included).
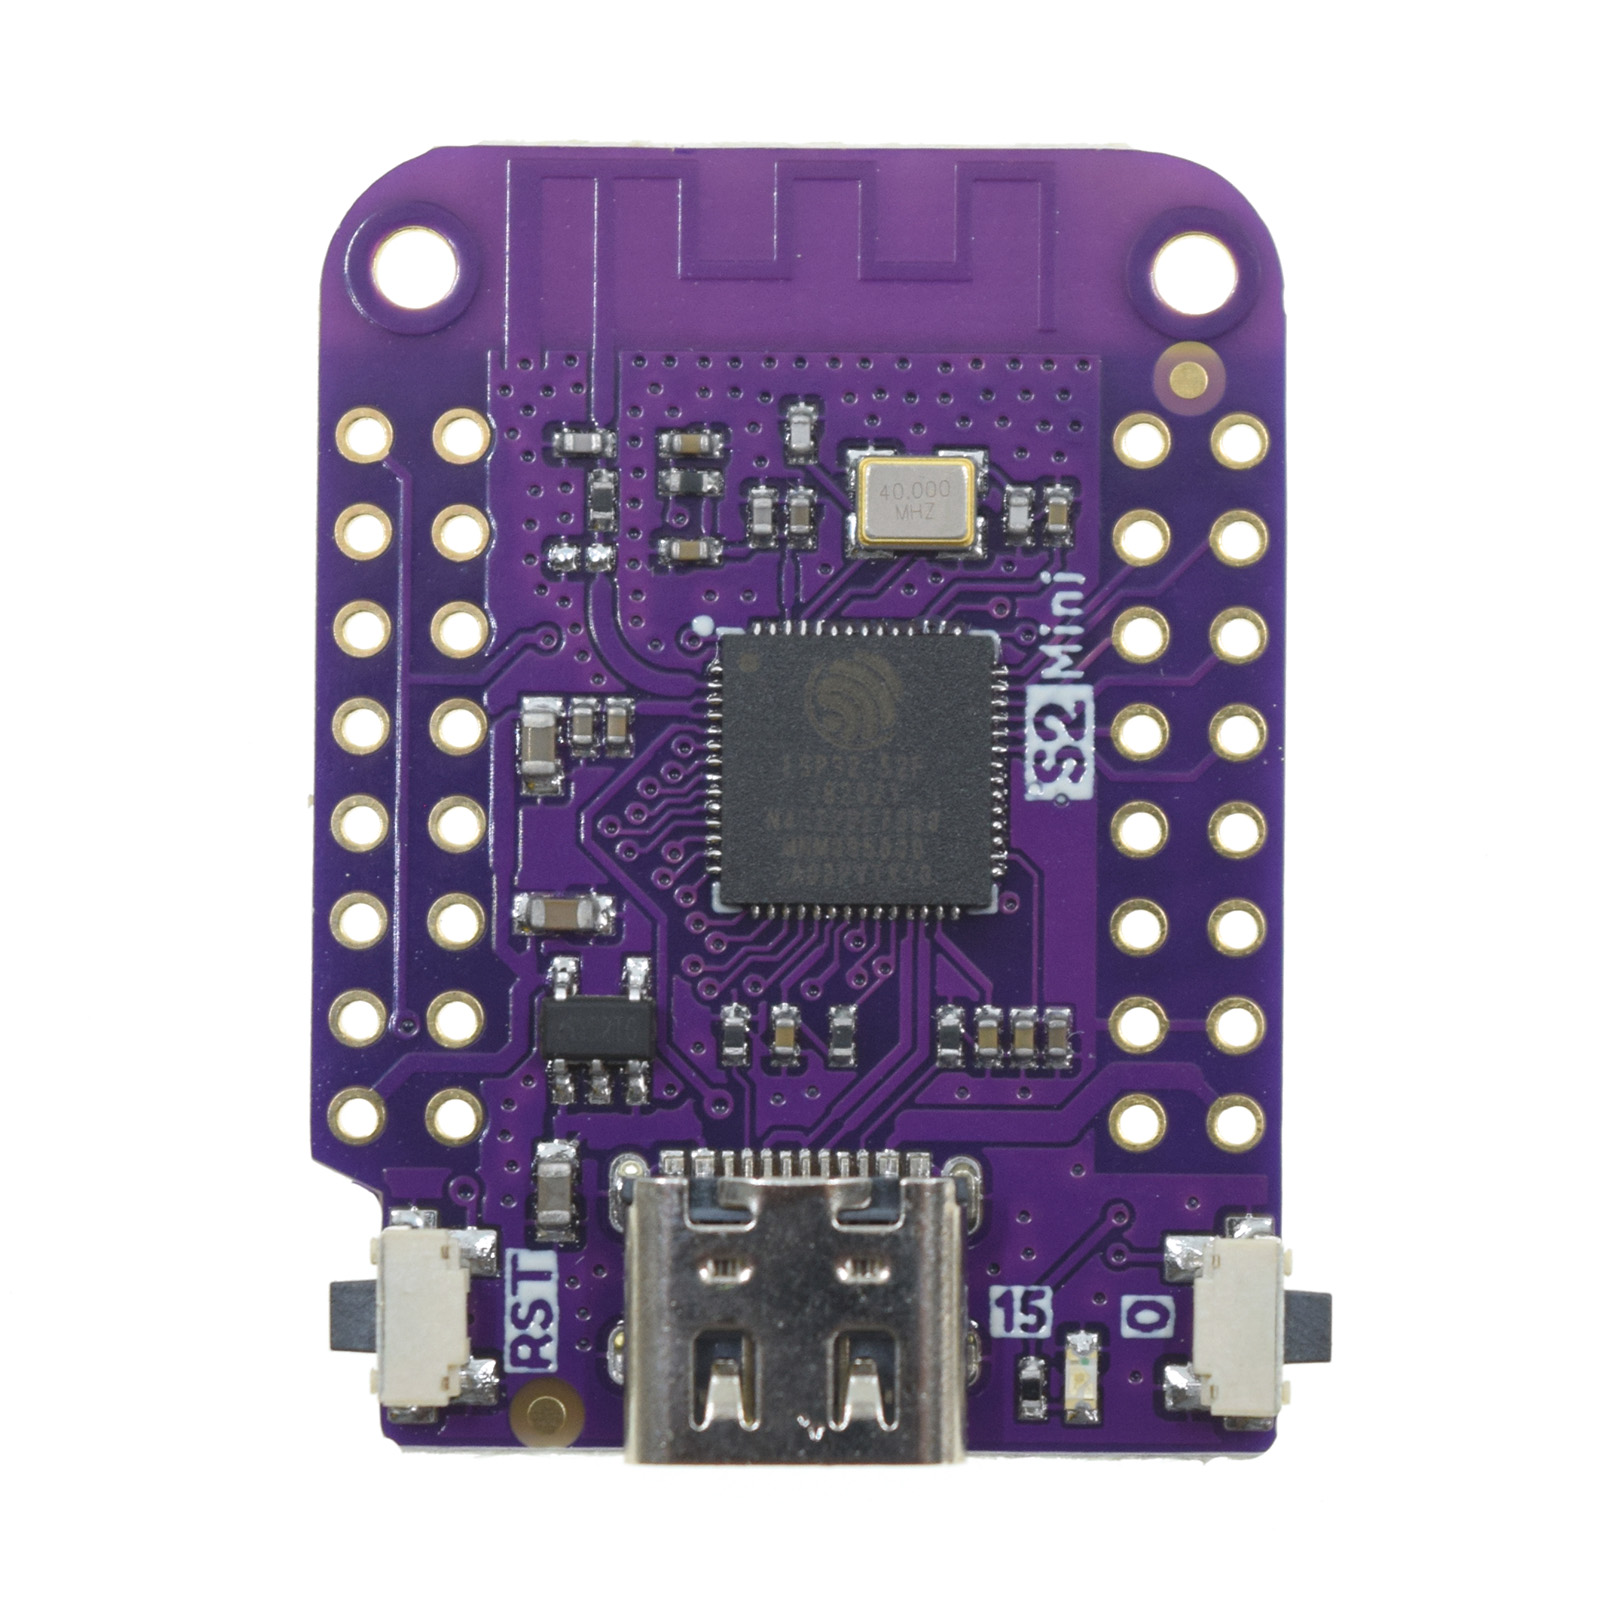
Lolin S2 Mini. Image from Wemos documentation
Connectors
The SwiCago/HeatPump project communicates with the Mitsubishi heat pump via the CN105 connector on the heat pump’s main board. So, we need a CN105 connector to connect our microcontroller to the heat pump. Thanks to Chris Davis’s article “Hacking a Mitsubishi Heat Pump: Part 1” I was able to find these 5 pin connectors that just barely fit into the CN105 port from AliExpress for $2.46 ($9.26 all included). Be sure to select the “5P” pin option when ordering!
Putting it Together
After a few weeks of waiting the AliExpress hardware arrived. So it was time to begin the fun stuff!
Hardware
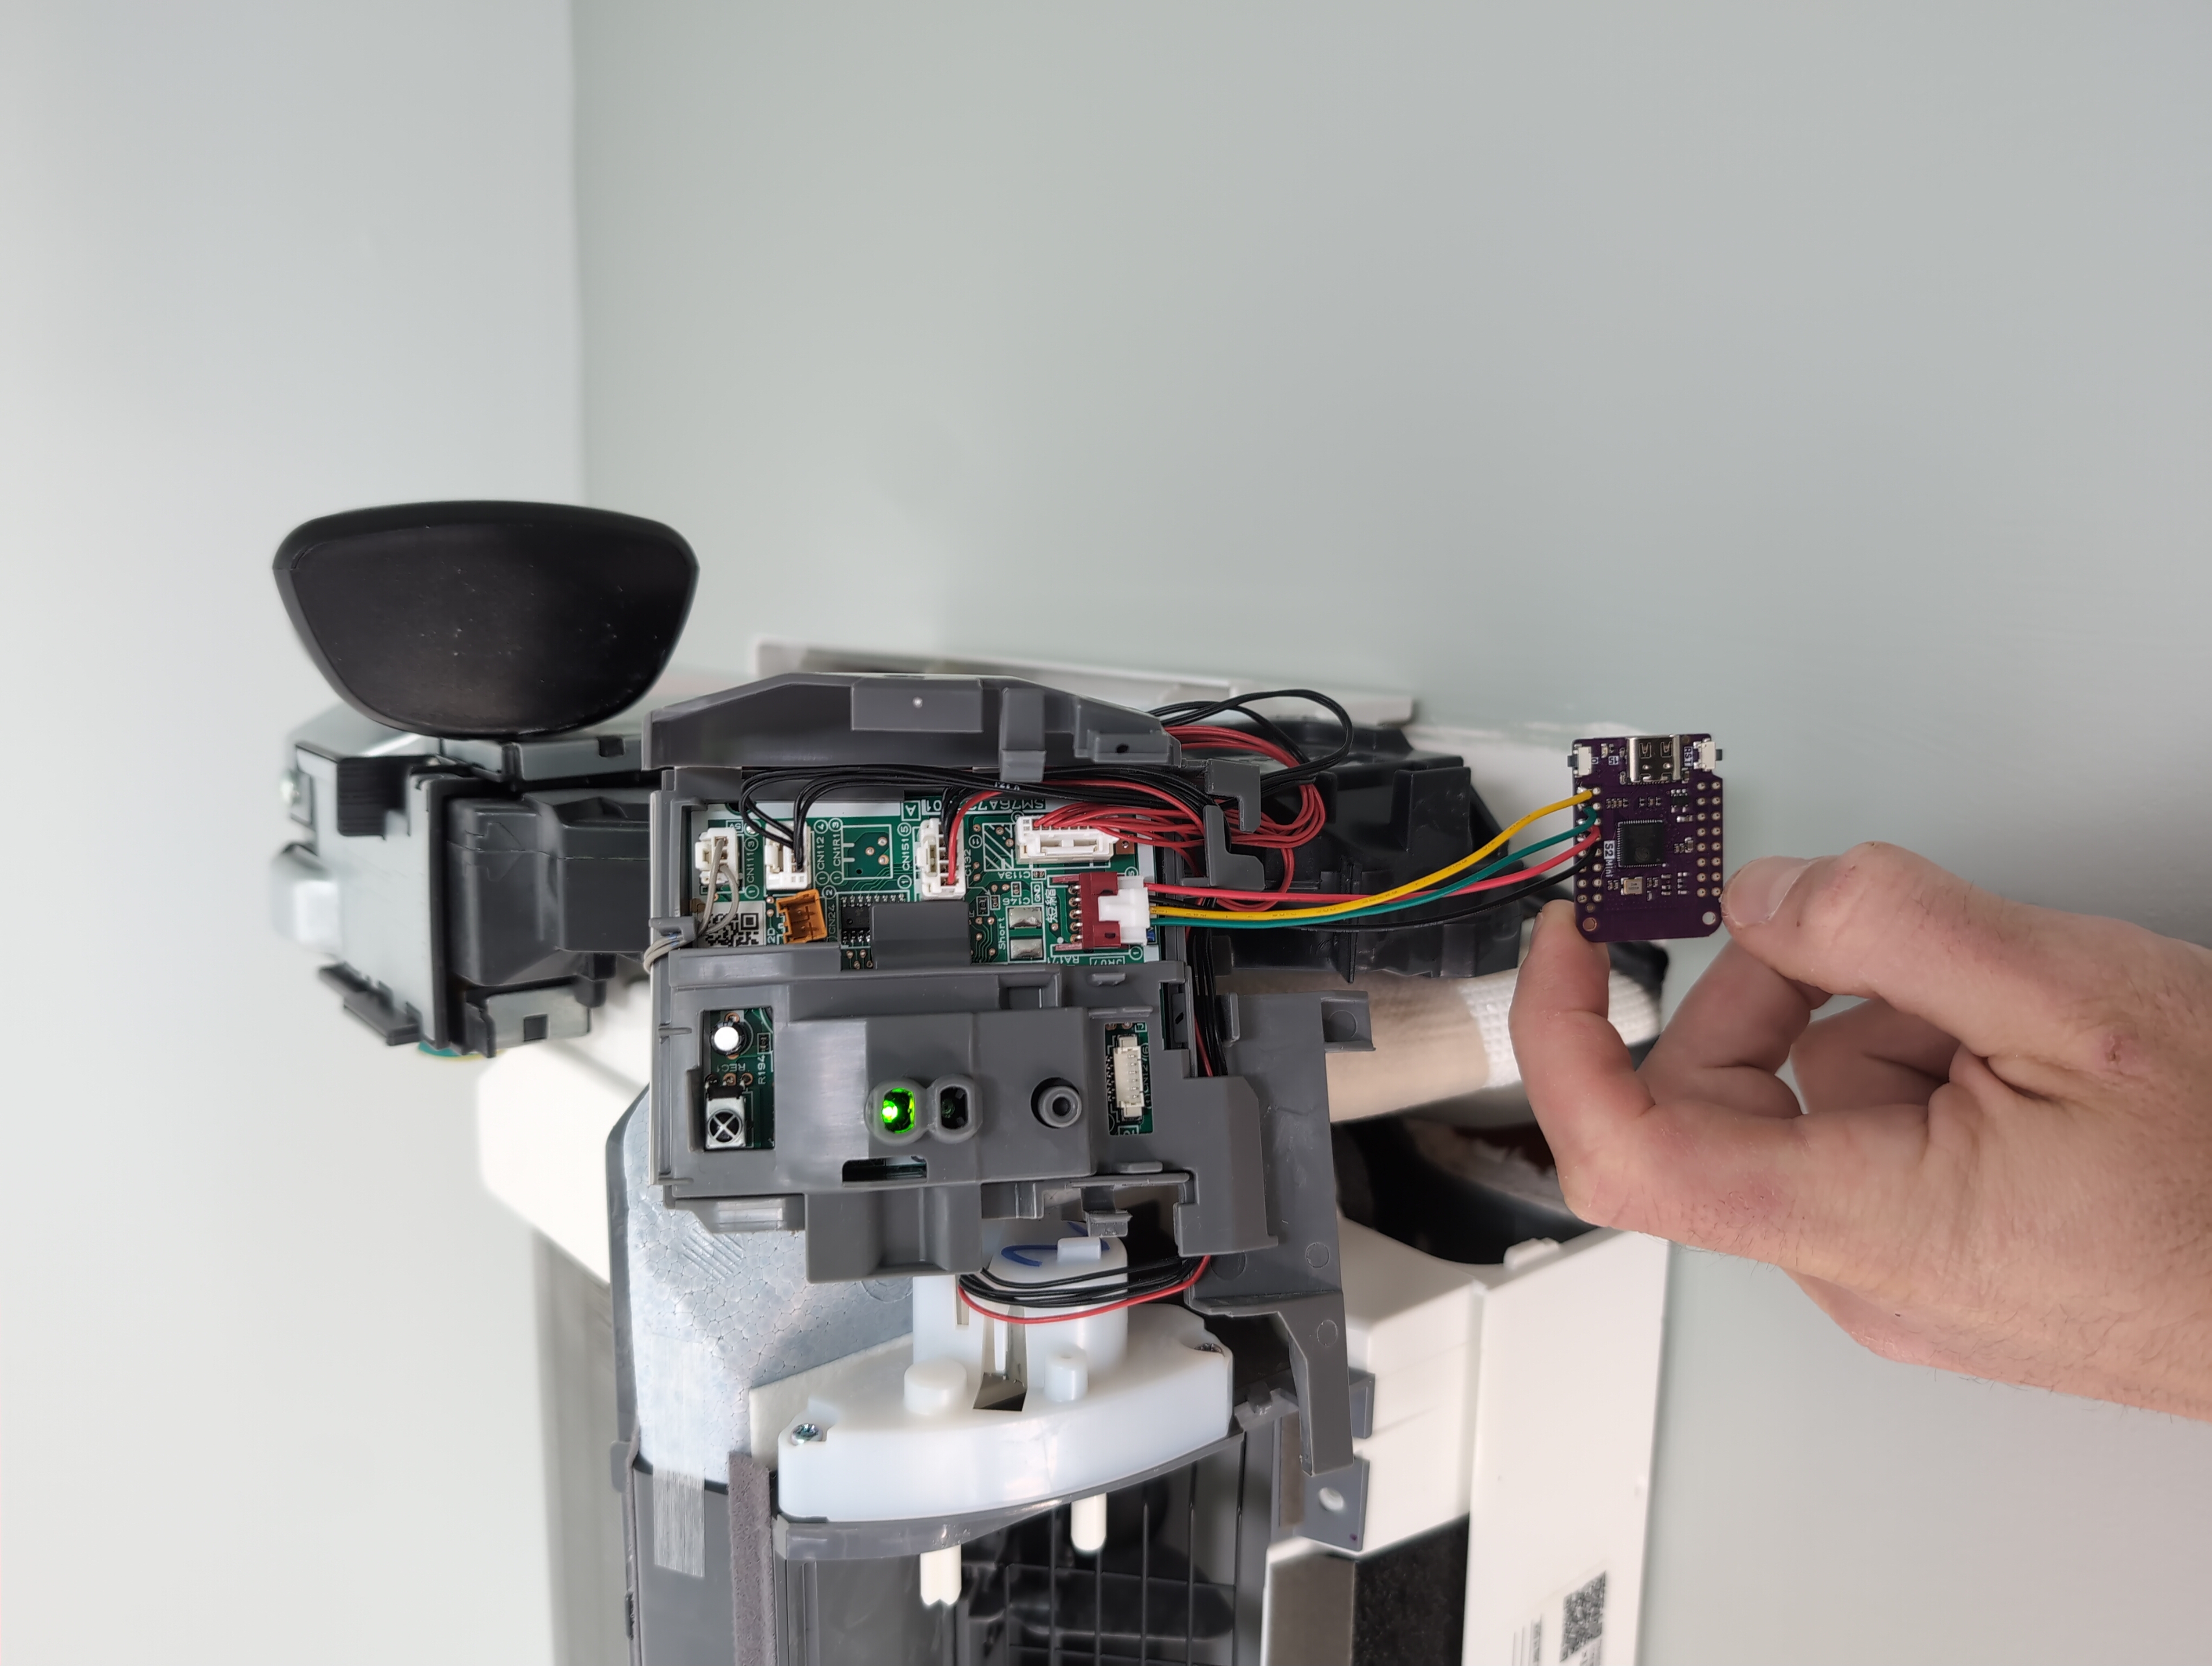
Solder the connetor’s wires to the right GPIO pins on the S2 Mini board.
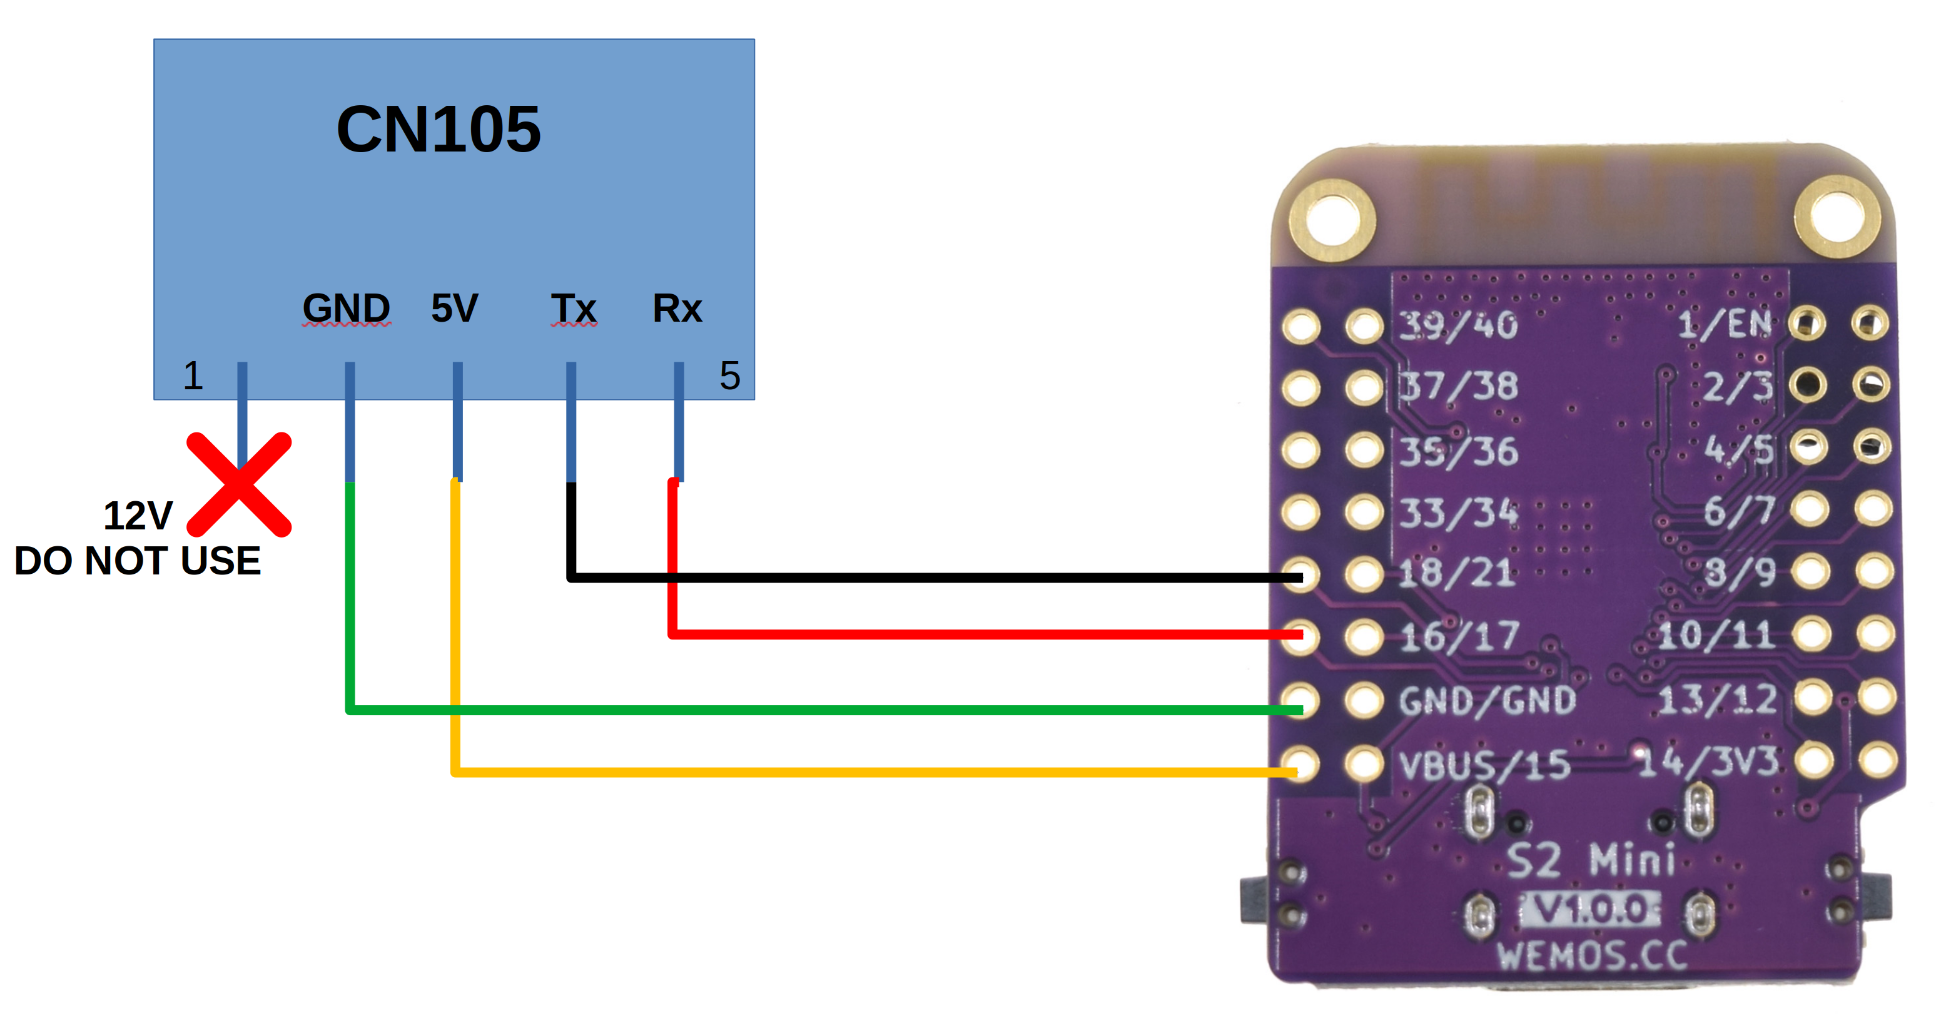
Wiring diagram for soldering the CN105 connector to the S2 Mini. DO NOT USE THE 12V PIN 1! I just snipped this wire at the base of the connector. Note: The colors in this diagram correspond to the wire colors that came on my 5-pin connectors. Your colors may differ.
It’s really nice that this configuration does not seem to require an external voltage regulator or pull down resistors to work!
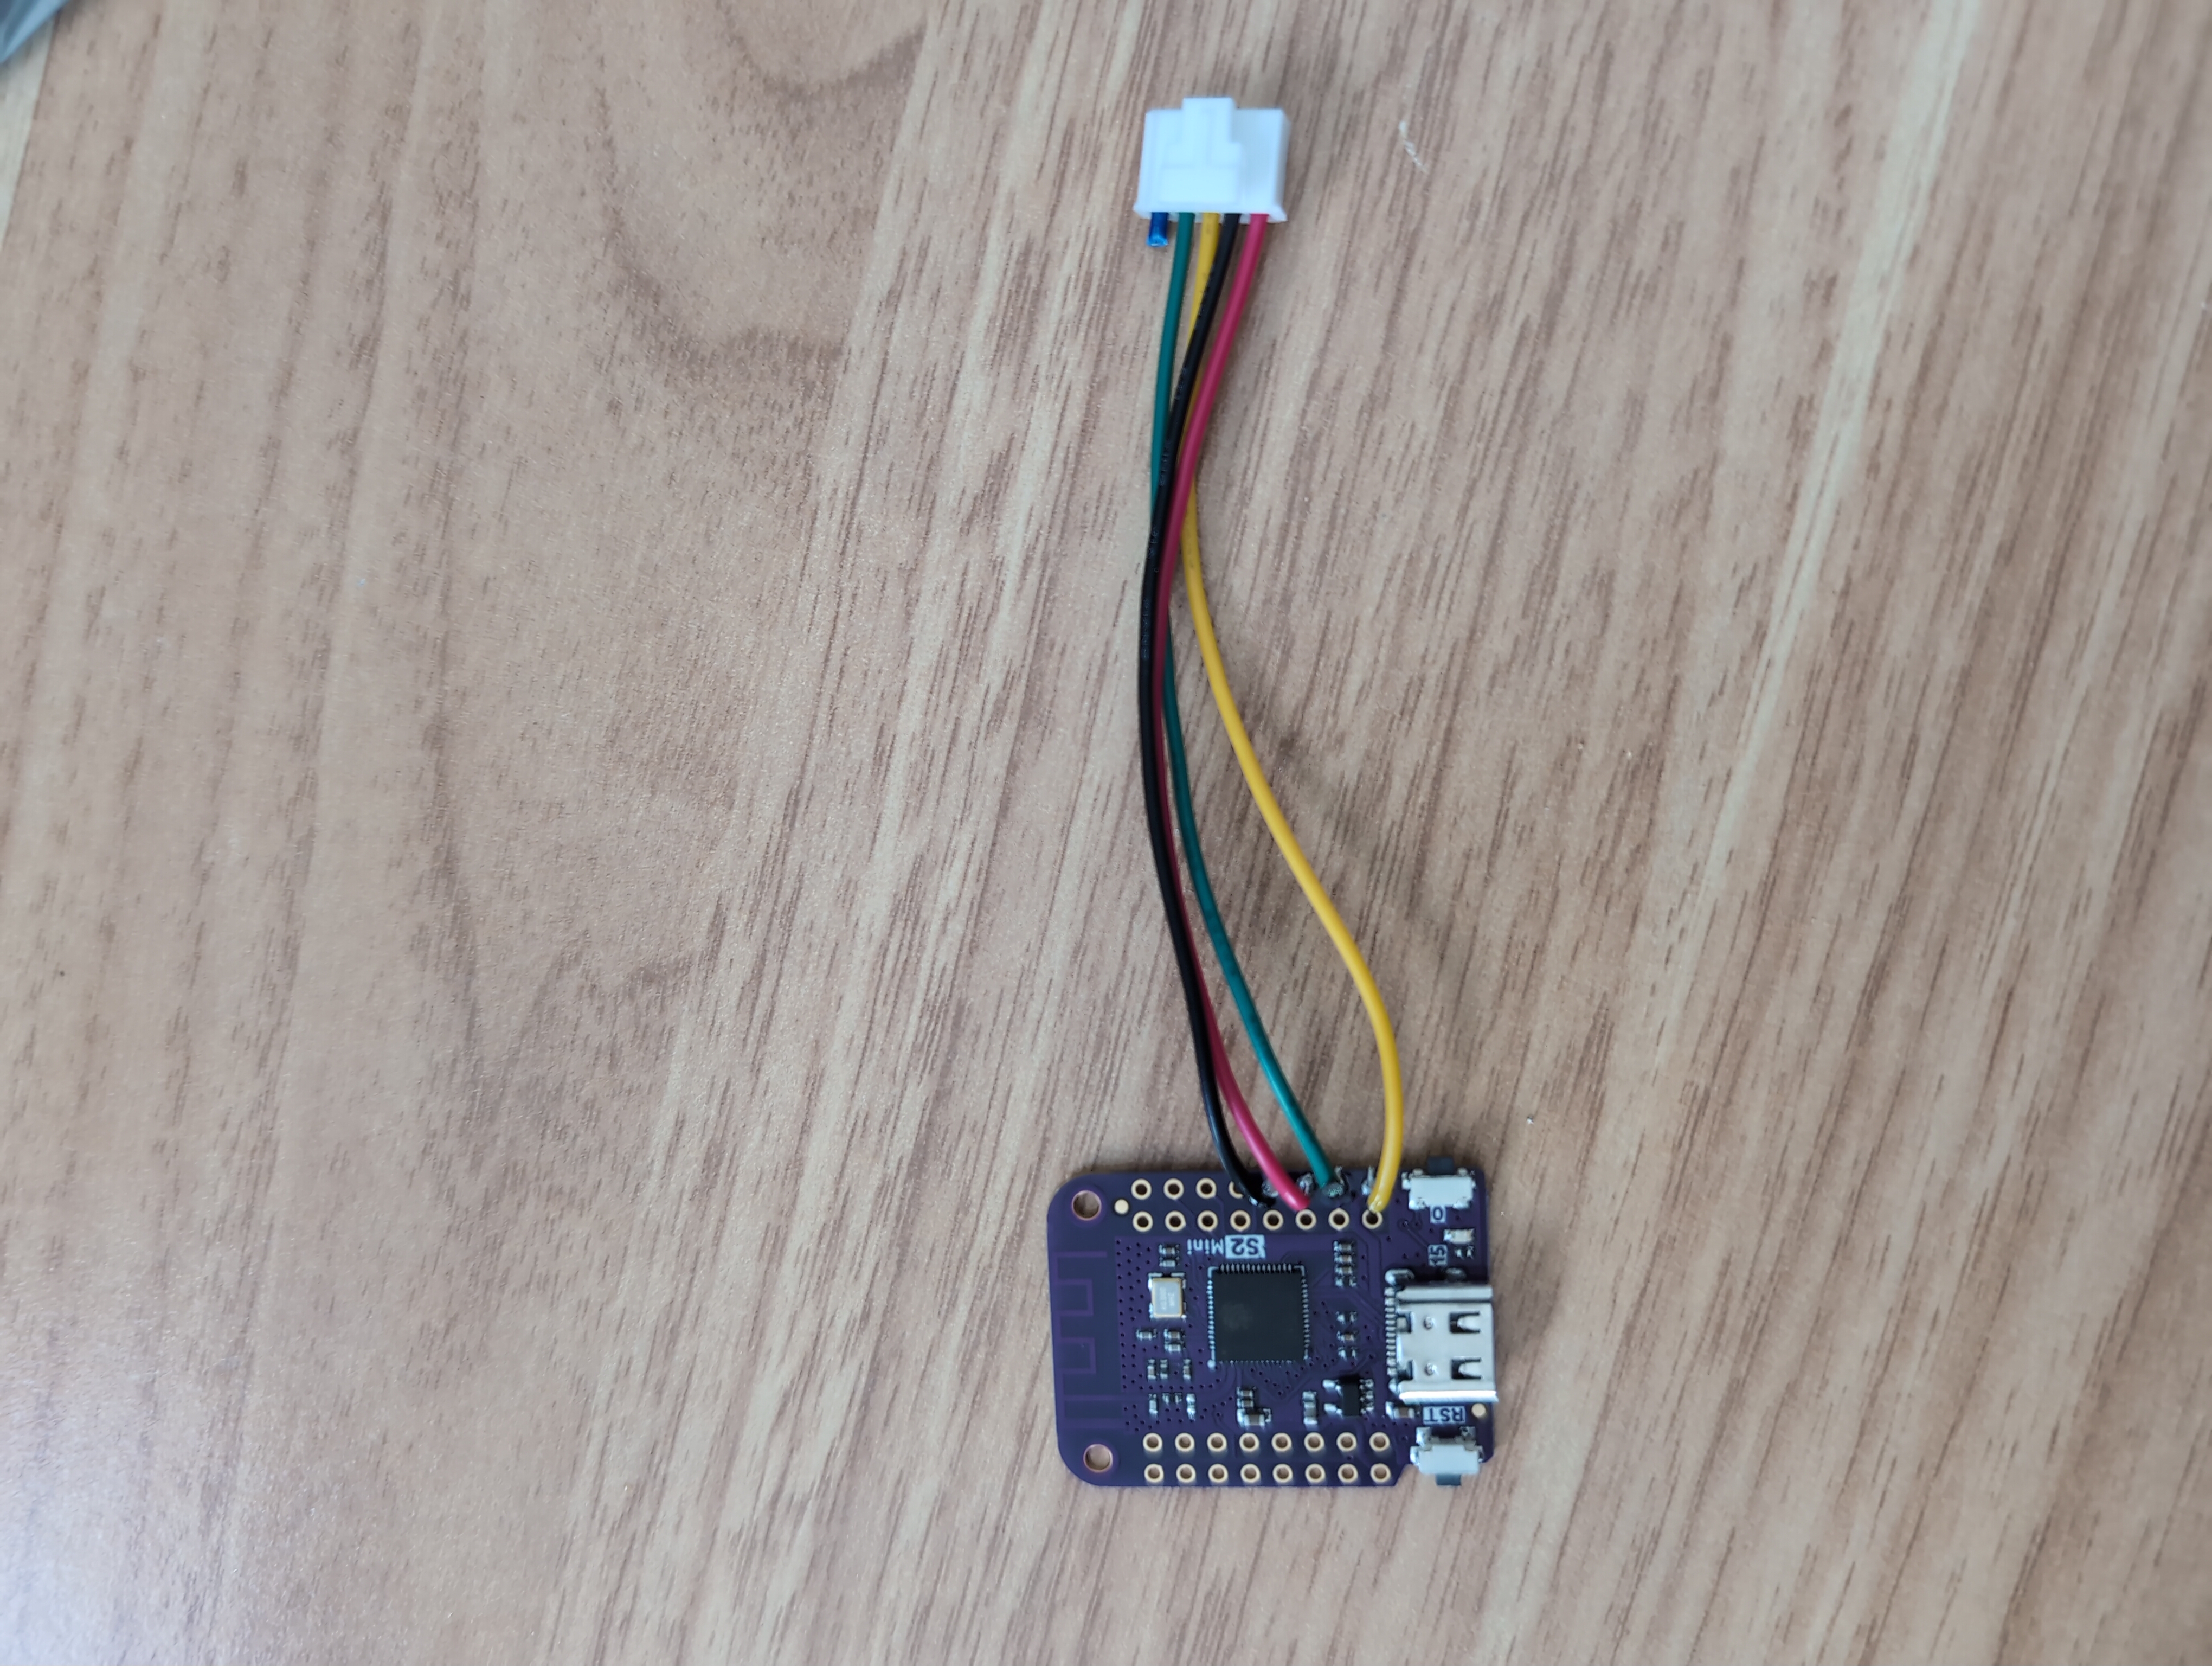
The CN105 connector wired to the S2 Mini.
Since this was going to be tucked up into the wall unit’s housing I covered the front and back of all the GPIO holes with a line of hot glue (not pictured here) to prevent any shorts.
Firmware
We can now use ESPHome + esphome-mitsubishiheatpump to build and flash the firmware to our fresh ESP32.
ESPHome is an incredible tool that allows anyone to quickly build custom firmware for ESP32-based devices. With ESPHome building complex, custom firmware is done through a single YAML file where one specifies all the important things needed to build the firmware for your specific use case.
The specifics of the firmware flashing are out of scope for this article. There are many ways to skin this cat, but the process I used looks roughly like this:
- Initial Firmware Flash: First flash the brand new ESP32 (Lolin S2 Mini) with a minimal ESPHome firmware using ESPHome’s Web Flasher tool. This allows us to get the ESP32 connected to my WiFi network and my local ESPHome server where I can later flash firmware updates over-the-air.
- After the initial firmware install the S2 Mini can be plugged into the heat pump’s CN105 port so that it can be powered on. Though, it will not be of much use as a controller quite yet.
- The new ESP device can be added to my local ESPome server.
- Edit this devices YAML (see config below) directly in ESPHome and save the changes. This will compile the new firmware and push it directly to the S2 Mini over WiFi.
- If all went well we should now have a controller that can either be accessed through a simple http site (for example at
http://<name>.local) or added directly into Home Assistant! My Home Assistant server autodetected the device, which was very nice :bowtie:
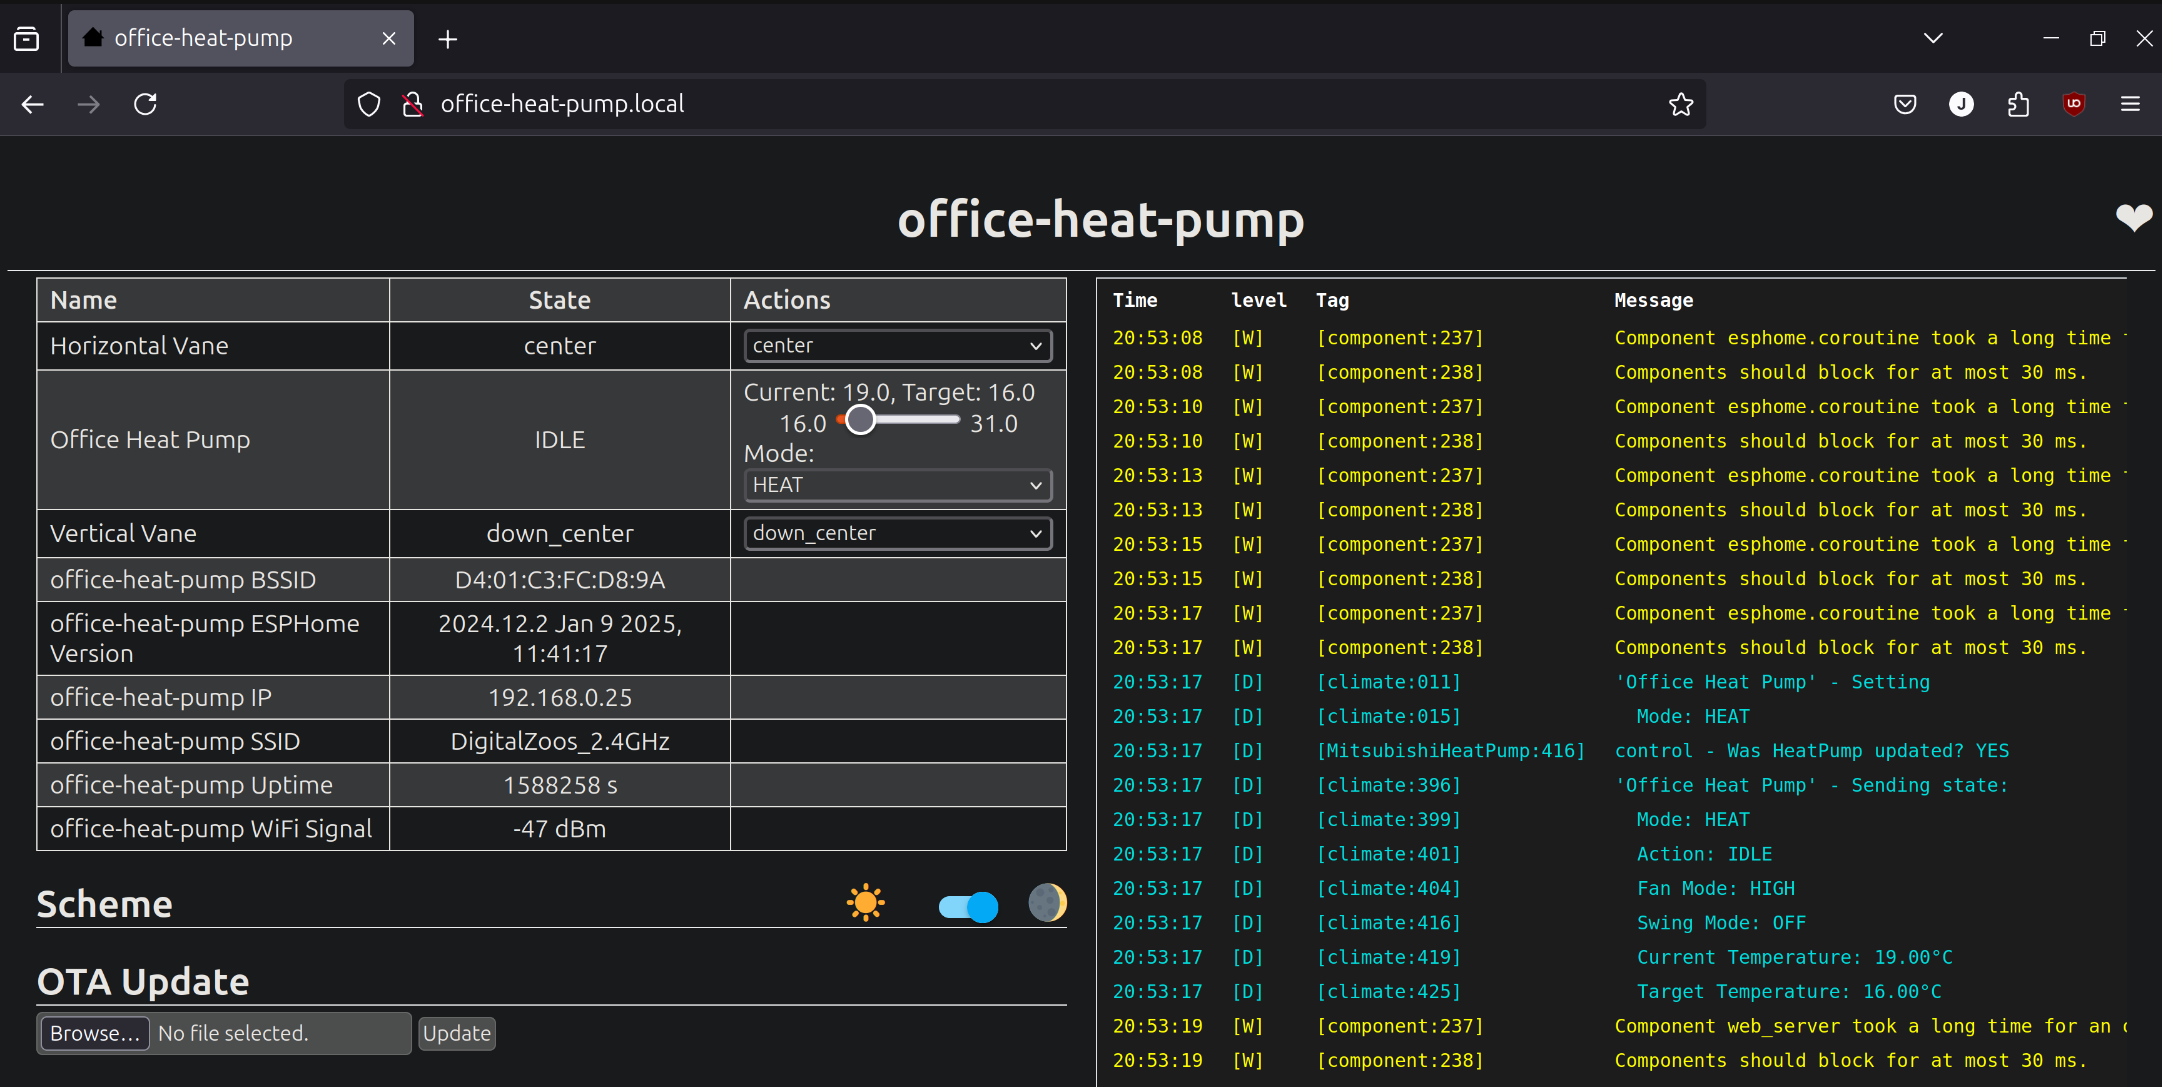
A look at the little http control page that is immediately available after successful firmware install. This interface was good for immediate debugging, but I prefer controlling this thing through Home Assistant.
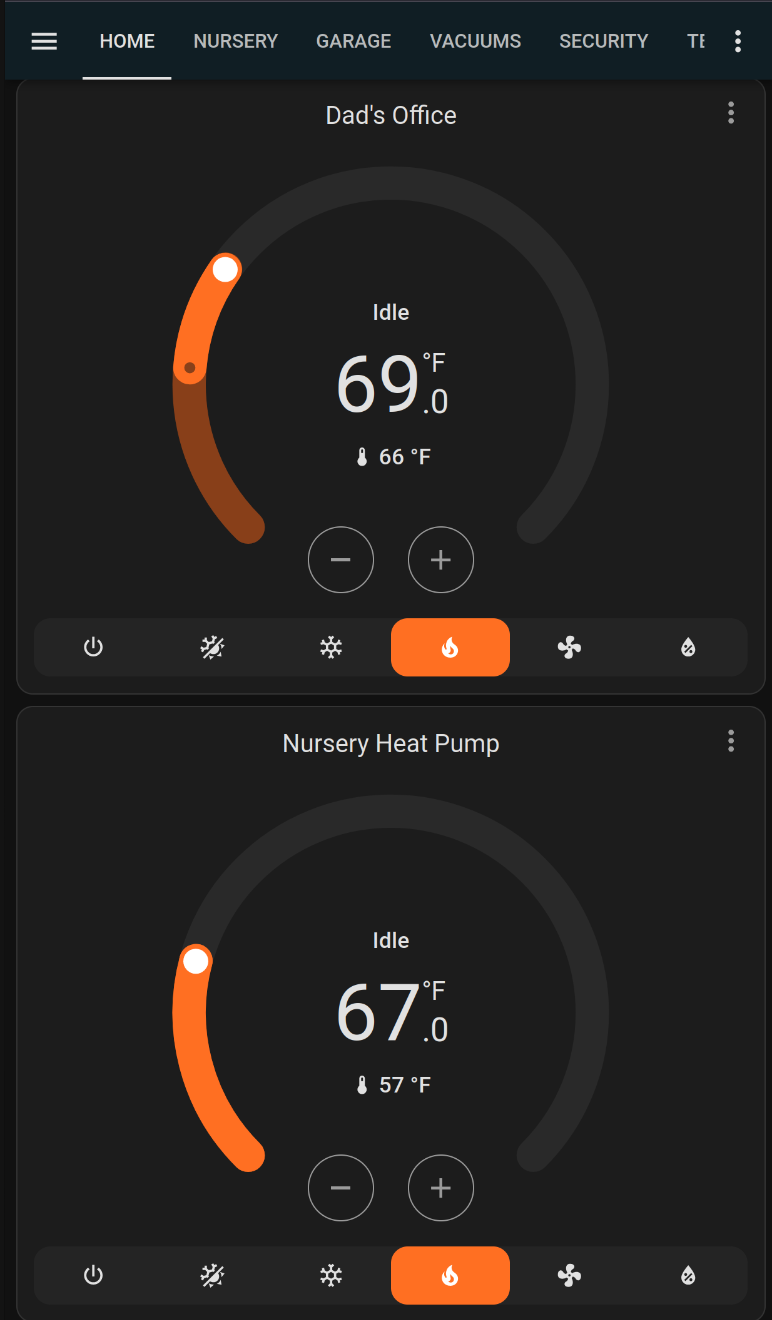
Here’s what the default control card in home assistant looks like for these two devices. Very slick!
Below is what my config ended up looking like. I pulled heavily from others examples in the esphome-mitsubishiheatpump documentation. Note your config may vary depending on the specific ESP32 dev board you use or which GPIO pins you choose for Rx and Tx.
substitutions:
  name: office-heat-pump
  friendly_name: Office Heat Pump

esphome:
  name: ${name}
  platformio_options:
    build_unflags:
      - "-std=gnu++11"
    build_flags:
      - "-std=gnu++17"

esp32:
  board: lolin_s2_mini
  variant: ESP32S2
  framework:
    type: arduino

wifi:
  ssid: !secret wifi_ssid
  password: !secret wifi_password

  # Enable fallback hotspot (captive portal) in case wifi connection fails
  ap:
    ssid: "Office-Heat-Pump"
    password: "IhVON5MbCZ2x"

captive_portal:

# Enable logging
logger:

# Enable Home Assistant API
api:

ota:
  - platform: esphome

# Enable Web server.
web_server:
  port: 80

  # Sync time with Home Assistant.
time:
  - platform: homeassistant
    id: homeassistant_time

# Text sensors with general information.
text_sensor:
  # Expose ESPHome version as sensor.
  - platform: version
    name: ${name} ESPHome Version
  # Expose WiFi information as sensors.
  - platform: wifi_info
    ip_address:
      name: ${name} IP
    ssid:
      name: ${name} SSID
    bssid:
      name: ${name} BSSID

# Sensors with general information.
sensor:
  # Uptime sensor.
  - platform: uptime
    name: ${name} Uptime

  # WiFi Signal sensor.
  - platform: wifi_signal
    name: ${name} WiFi Signal
    update_interval: 60s

external_components:
  - source: github://geoffdavis/esphome-mitsubishiheatpump

climate:
  - platform: mitsubishi_heatpump
    name: "${friendly_name}"
    horizontal_vane_select:
      name: Horizontal Vane
    vertical_vane_select:
      name: Vertical Vane
    # ESP32 only - change UART0 to UART1 or UART2 and remove the
    # logging:baud_rate above to allow the built-in UART0 to function for
    # logging.
    hardware_uart: UART1
    # Here the rx and tx pins can be configured to use whichever GPIO pins on your board.
    # These are the ones I use in the example above
    rx_pin: 18
    tx_pin: 16
    baud_rate: 2400
    update_interval: 500ms
For the 2nd room’s ESP32 I used essentially the same config structure only changing unique things like the name, friendly-name, and ap.ssid.
Physical Installation
Obviosuly one needs to open up their wall unit, find the unit’s control board and CN105 port, connect the ESP32, and close everything back up. Fortunately, for my unit, and probably many others, this process was not all that difficult and getting to the control board really just required removing the big plastic covering on the wall unit.
If you have a Mitsubishi heat pump I would highly recommend checking out this site: MESCA Technical Information Center. Here I was able to find just about every imaginable service and installation manual imaginable for my MSZ-GS09NA units. The manuals are dense, but they did contain step by step instructions on getting to the control board along with some nice graphics showing where the CN105 port was located.
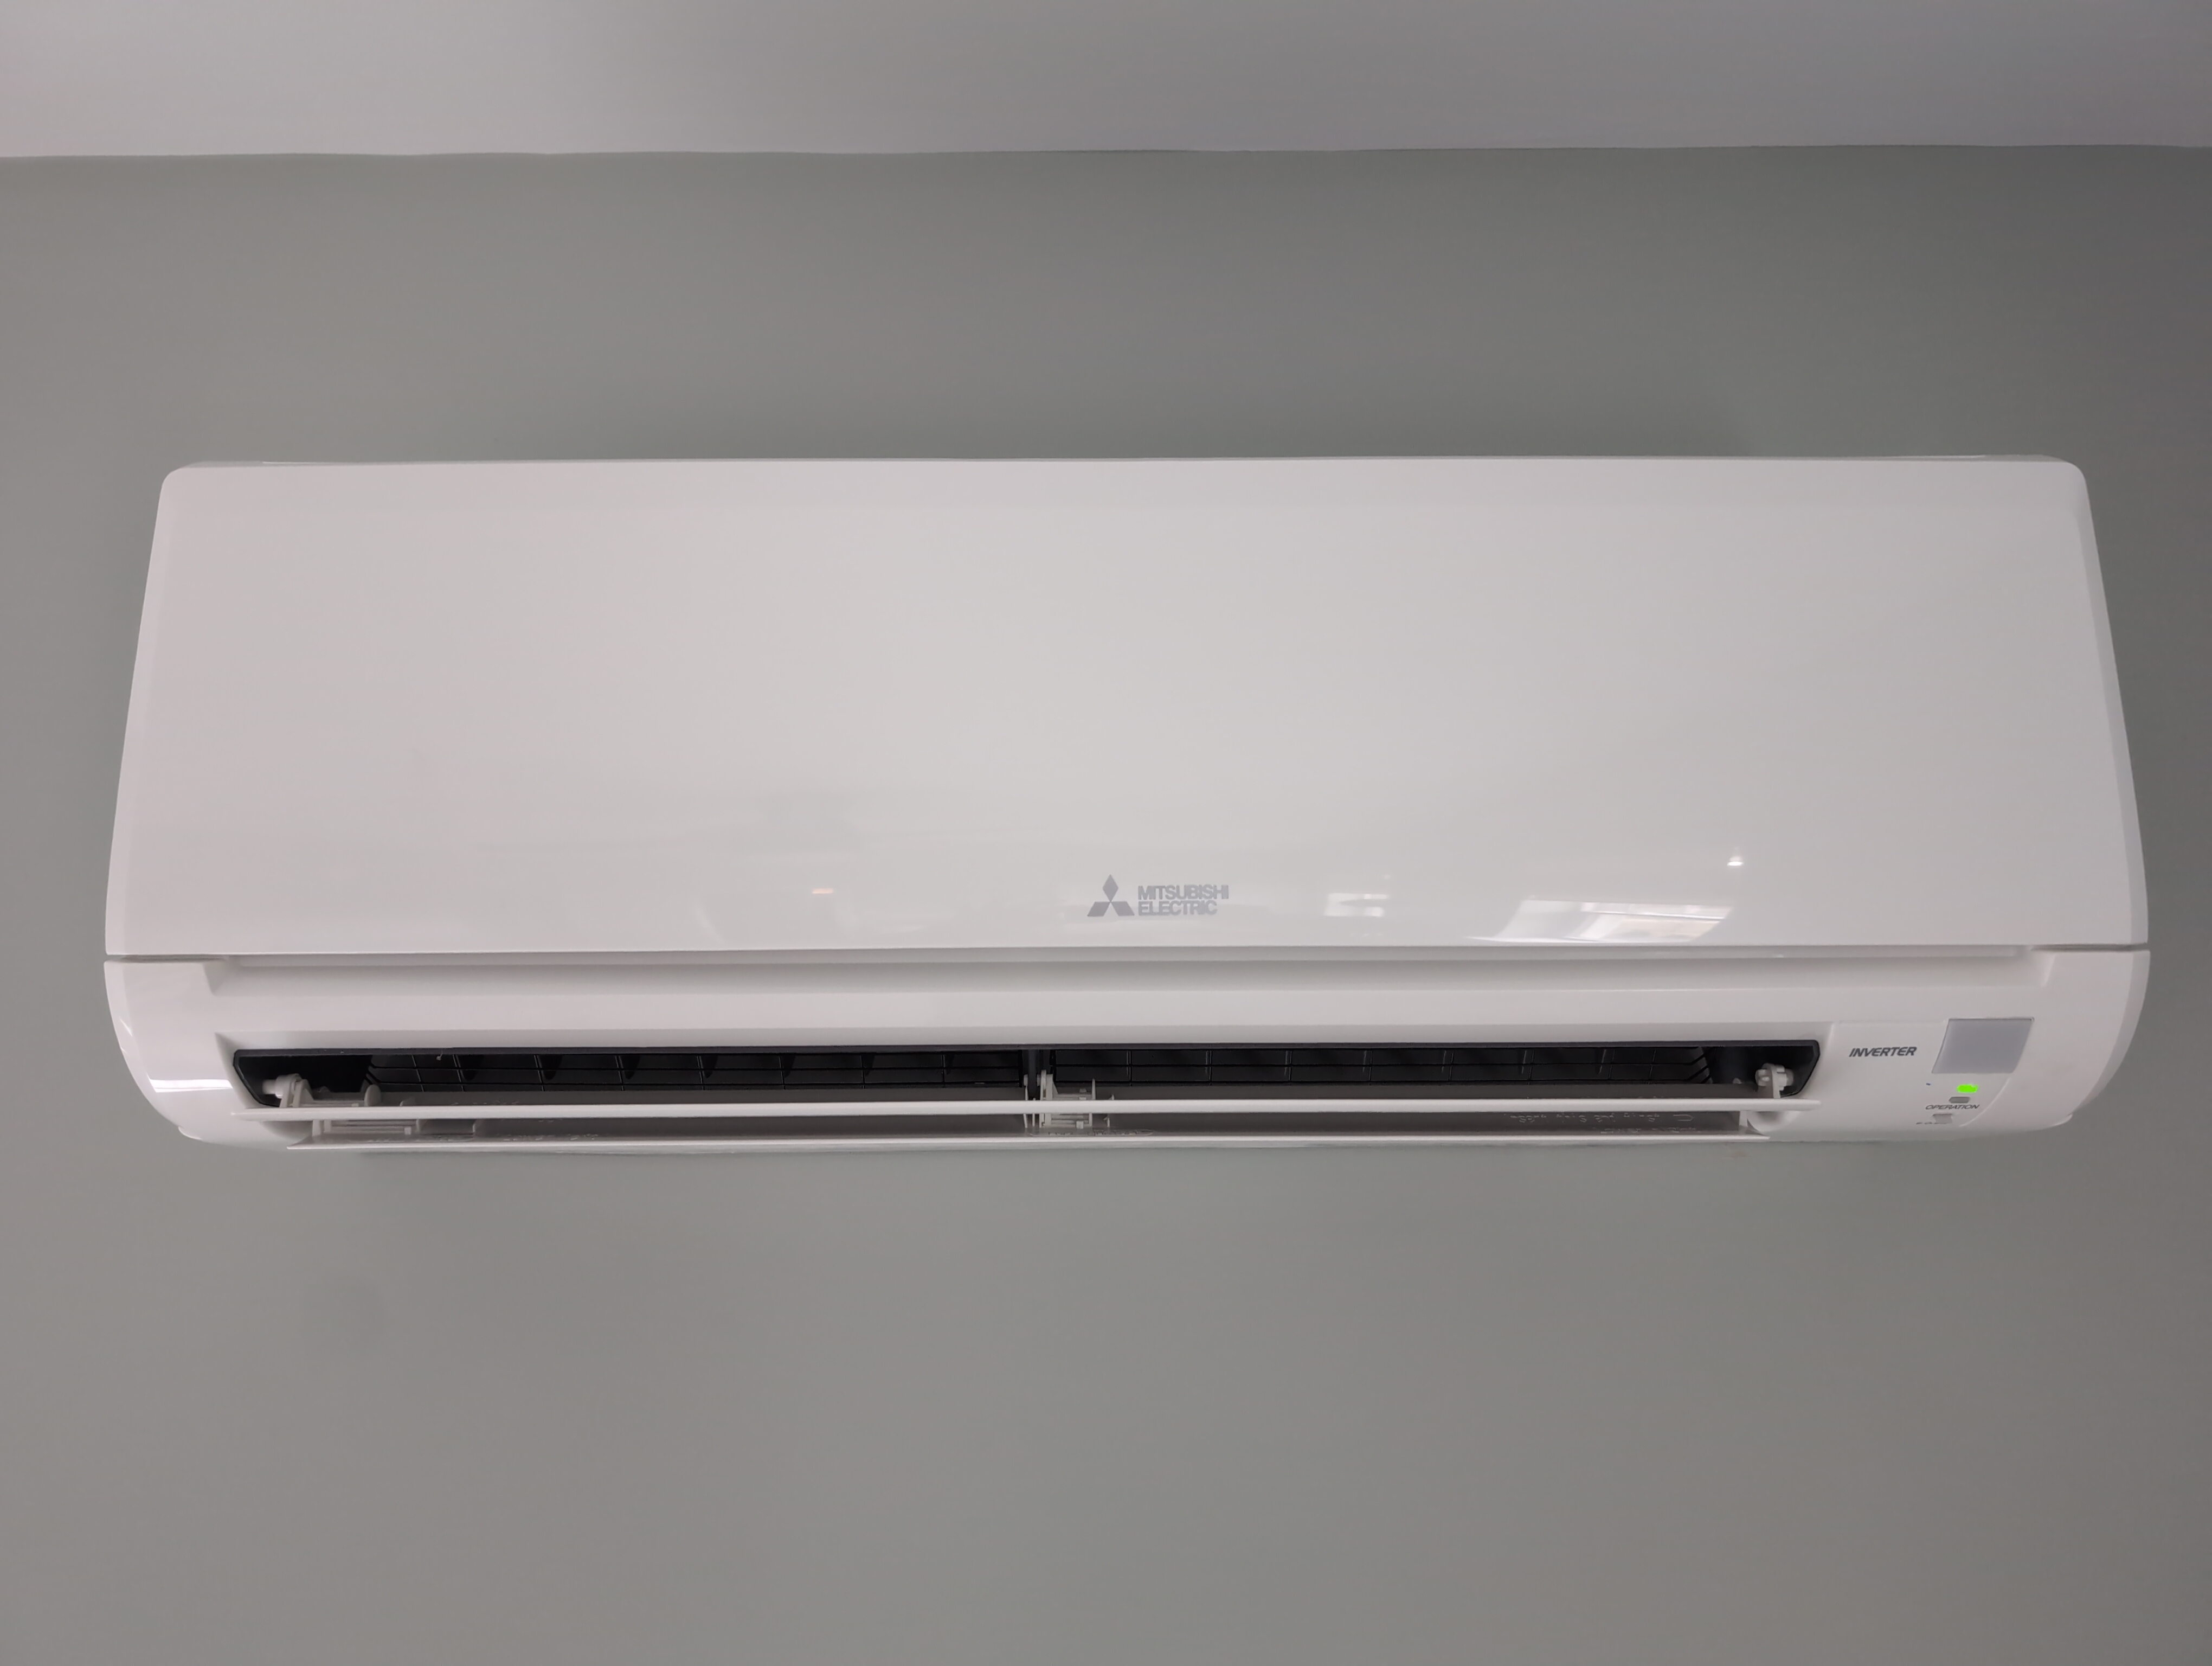
Before the procedure ![]()
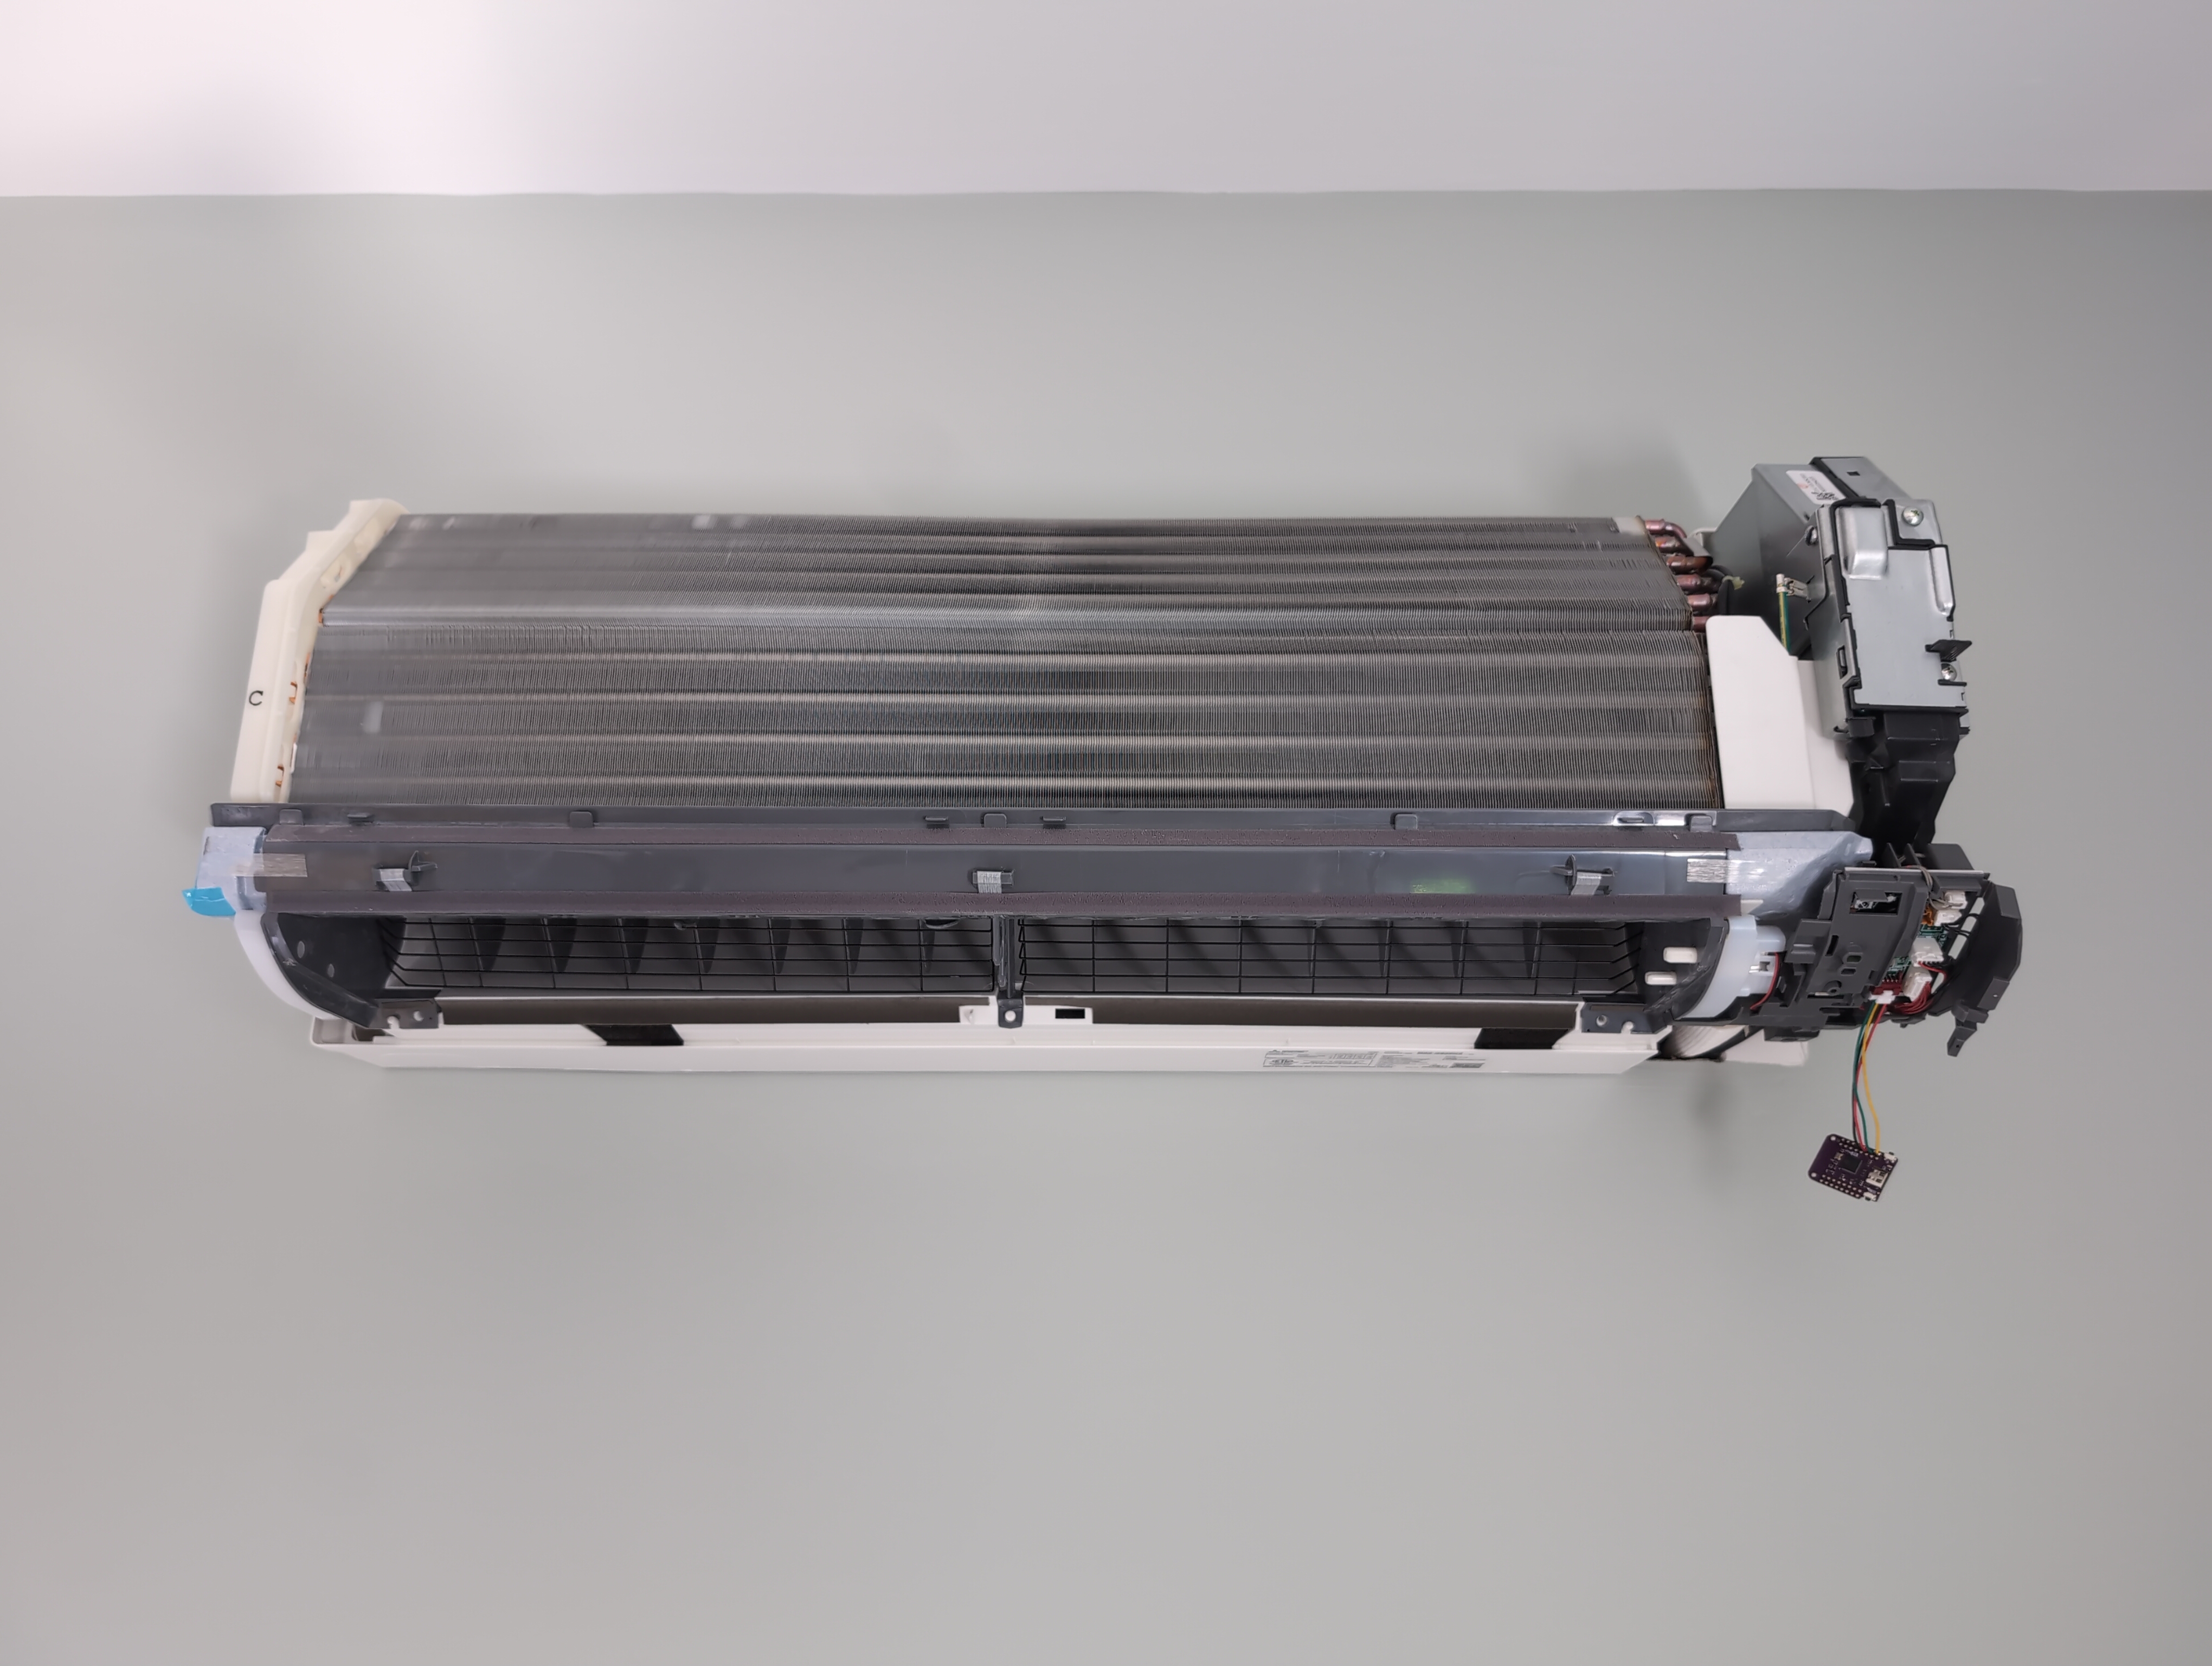
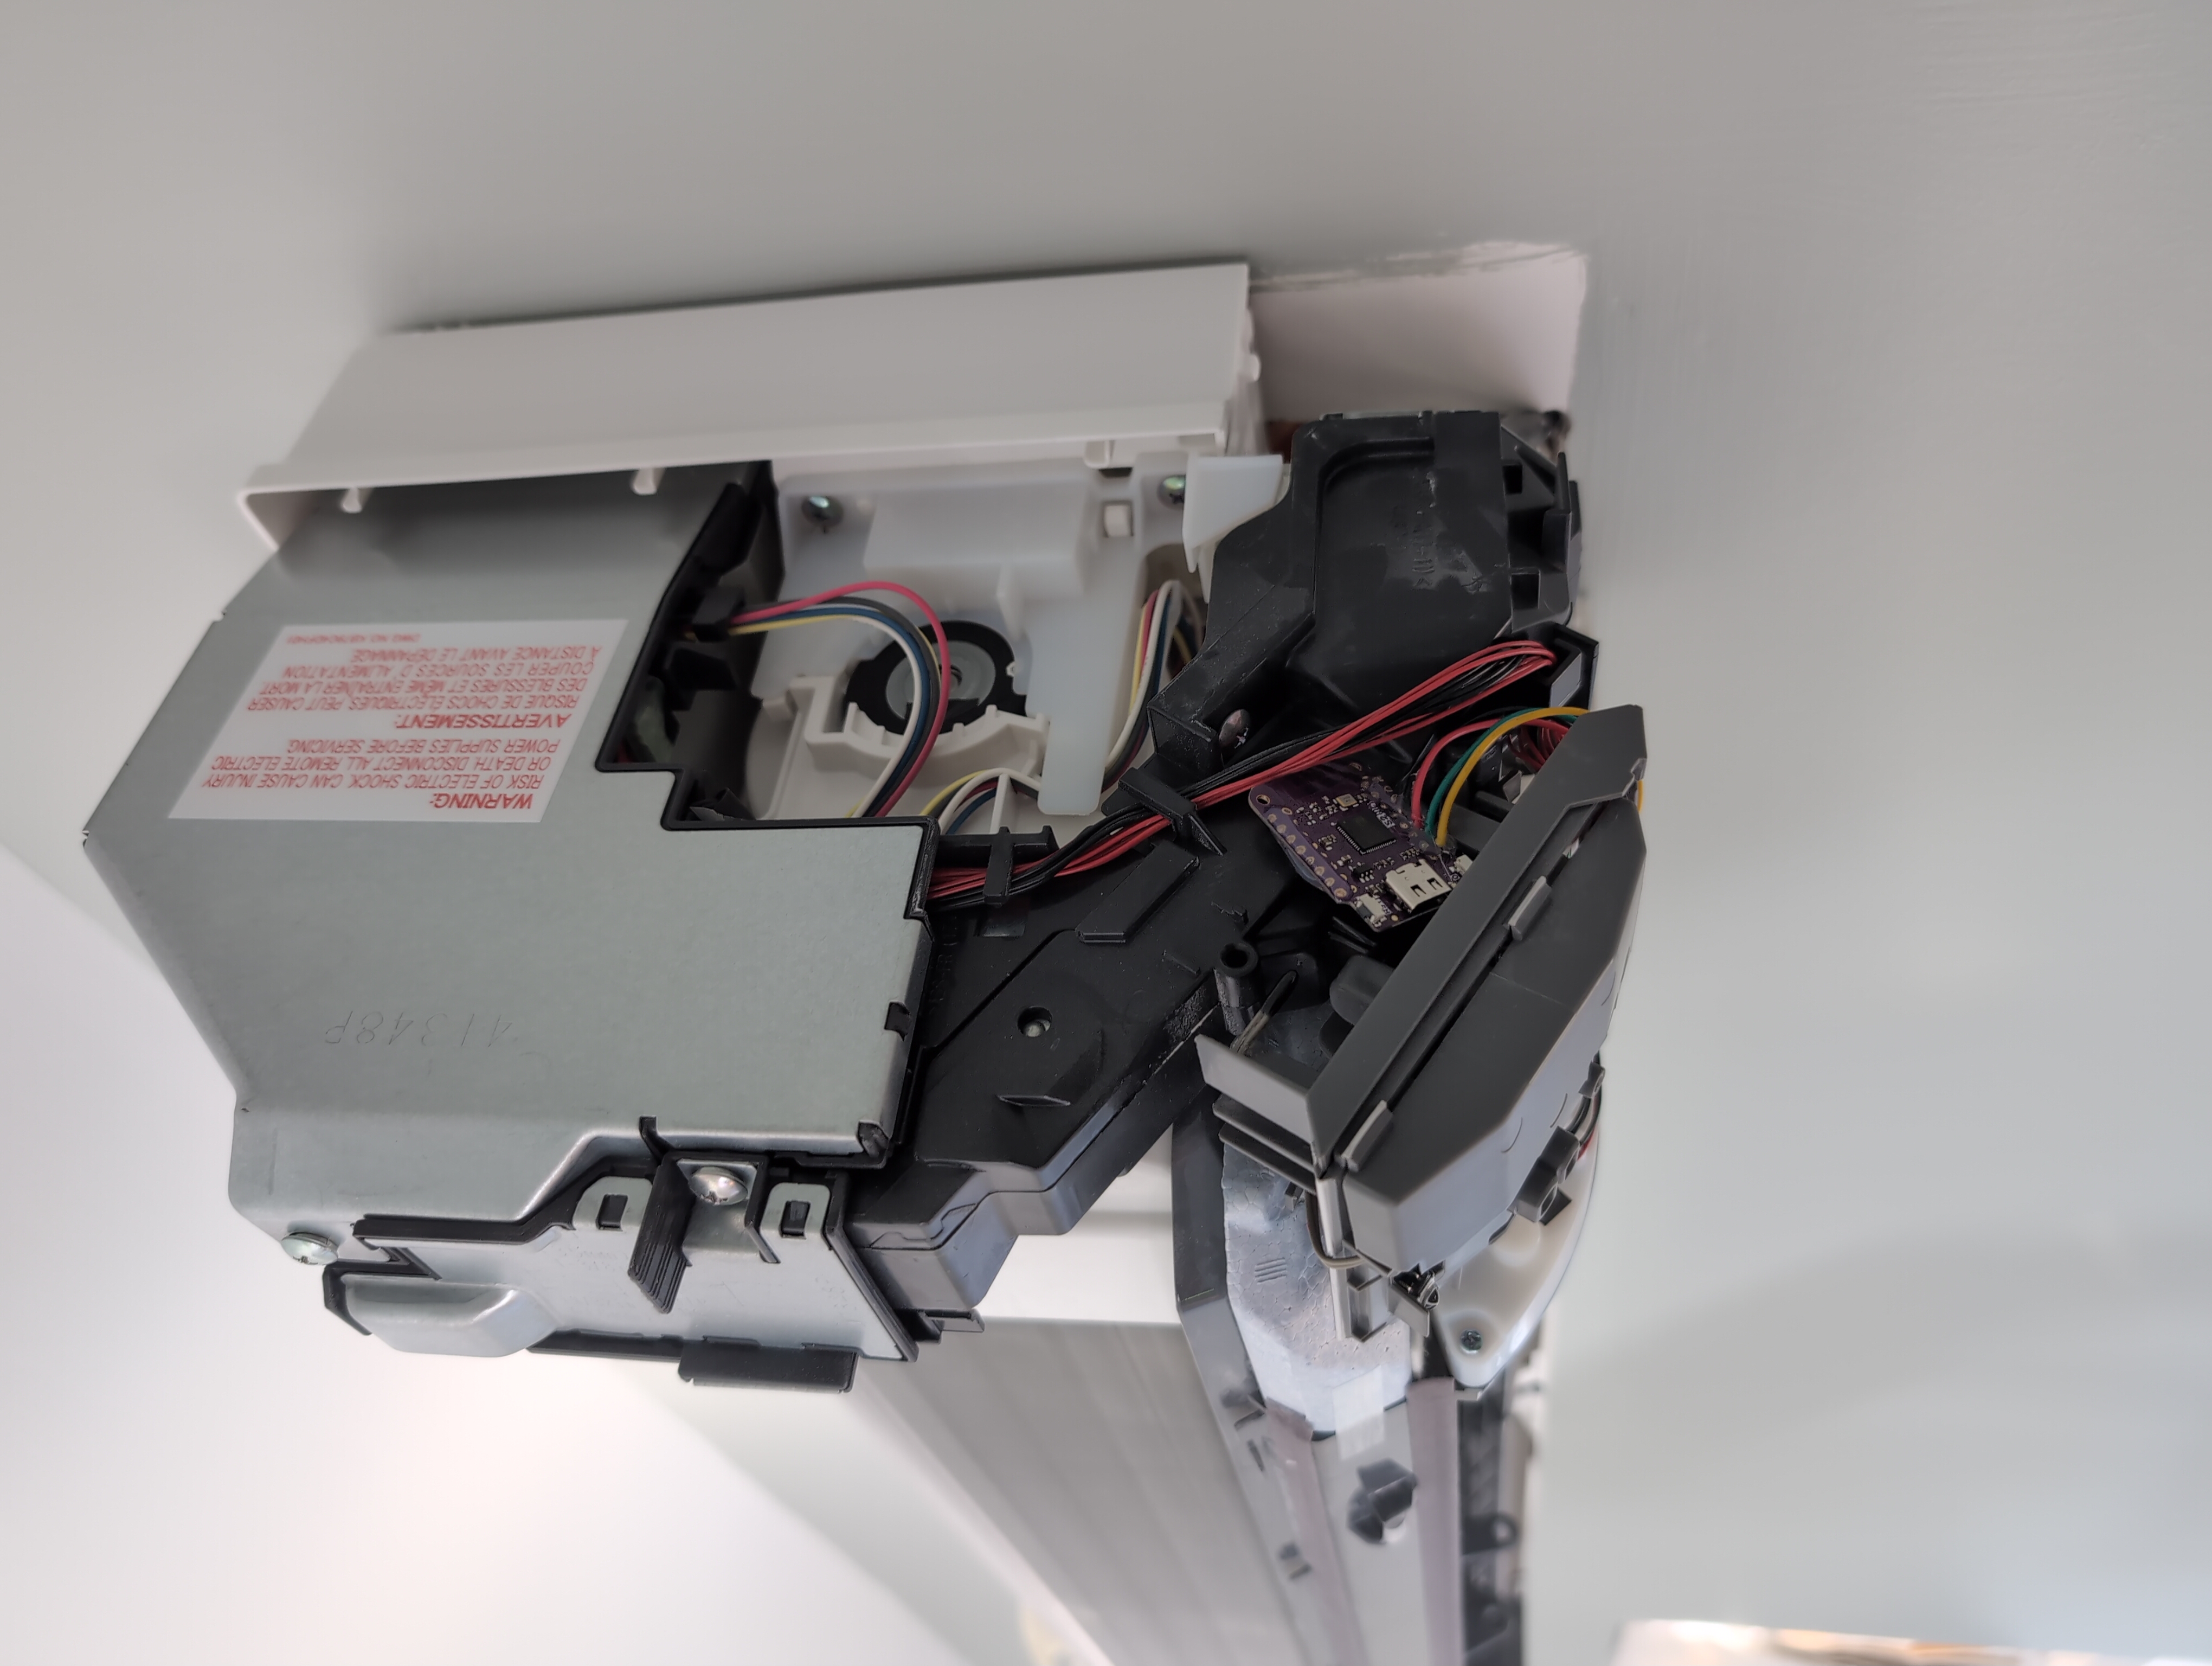
Installing the device and tucking it away ![]()
After the procedure ![]()
Give Me Local Control, Or Give me Death! 

Just like that my two “dumb” heat pumps were now “smart” and locally controllable with around $22 worth of hardware.
To recap here are some of the things that are now possible:
- Heat pumps are now integrated into Home Assistant and no cloud connections were needed


- I can now see the heat pump’s room temperature reading


- The little wall remote still works. When it is used to chamge the wall unit’s temperature setpoint the ESP32 can see those changes which are reflected in Home Assisstant. Although, because the remote’s communication only works in one direction it will not updates it’s little display when setpoint changes are initiated from the ESP32


Conclusion
This was a really cool project and Im really blown away by how well it works. Im often awestruck at the open-source projects that people create in their free time and want to express my gratitude to all of the projects that made this possible:
Thanks for reading and good luck with your projects!
- Joe